Clients
Add a client, find one, and keep their details up to date. Everything else in ITFlow - tickets, documentation, invoices - hangs off a client.
A client is a company you look after. Its contacts, locations, devices, logins, tickets and invoices all sit under it. The Clients list shows every active client, with their open tickets, what they owe and what they bring in each month.
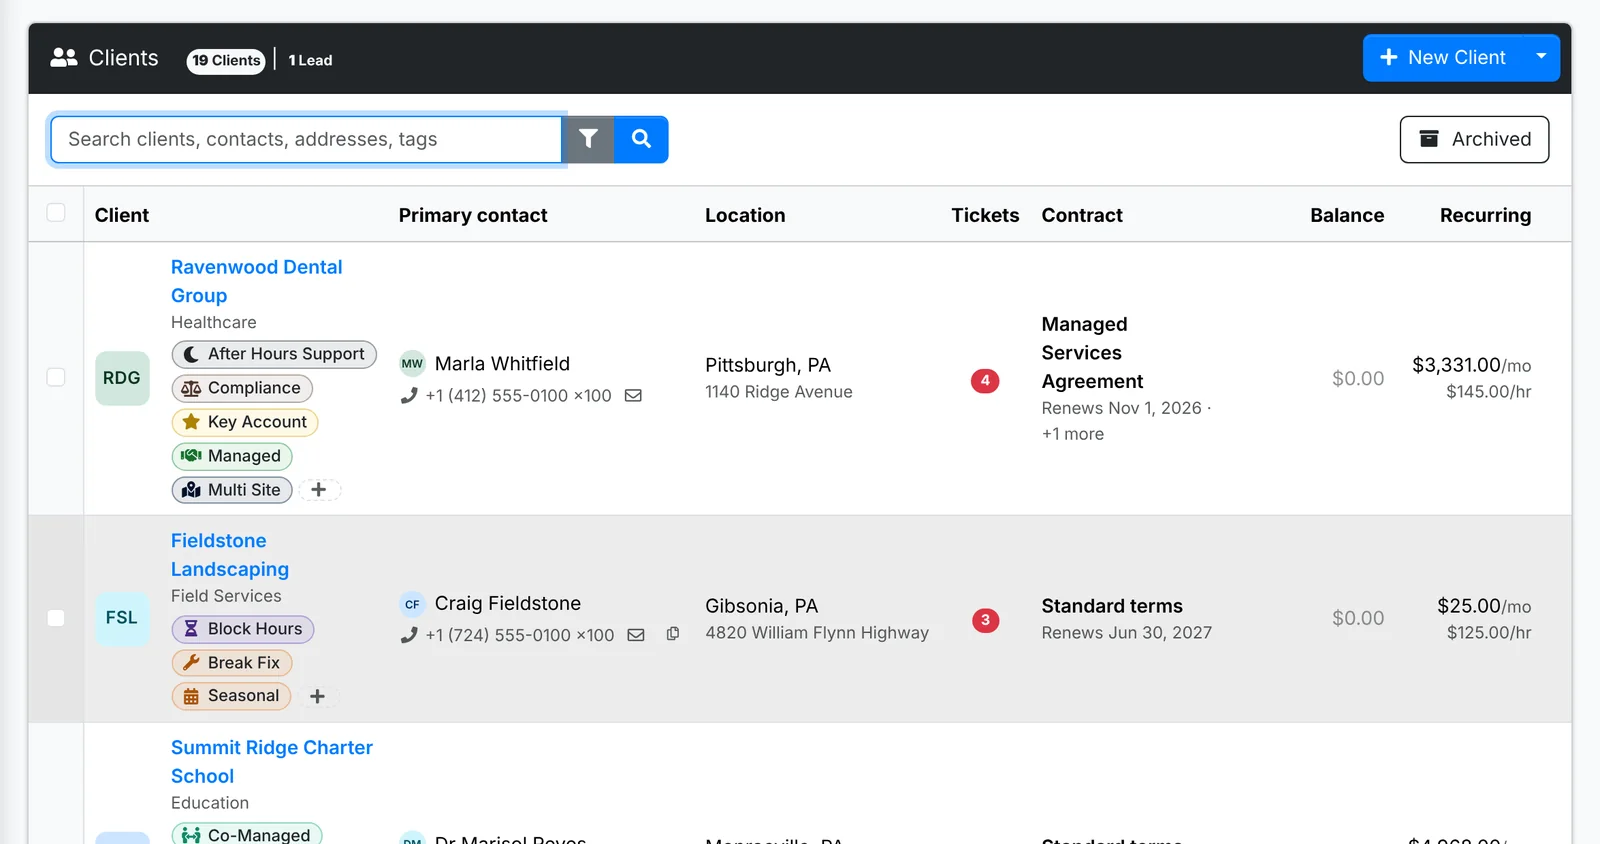
The clients list
Each row shows:
- the client's initials, name and industry, with their tags - click the + to add or remove one
- their primary contact, with phone and email
- their primary location
- their open tickets
- their contract - the one in force, with when it renews or ends, and +1 more when others are in force too. None means they're billed on your defaults: it shows the next contract to start, or a draft, if they have one, or Start a contract.
- their balance - what they owe you, with how much of it is overdue
- recurring - what their recurring invoices bring in a month, and the hourly rate they're billed at - their contract's, or your default rate, marked (default)
Click anywhere in the client's name to open it. The ⋮ at the end of the row has Edit and New Ticket.
The funnel button beside the search box opens the filters: Tags, Industry, Referral, Contract - one in force, none in force, or one started from a particular template - and when the client was Created. Click Contract at the top of the column to sort by it.
Leads
A lead is a company that isn't a client yet - someone you're quoting for. The title bar shows how many clients and leads you have: click Leads to switch to them, and back. You can send a lead a quote and keep notes on them like any client. When they sign up, edit them and untick Is Lead - or onboard them, which makes them a client and takes you through the rest.
Add a client
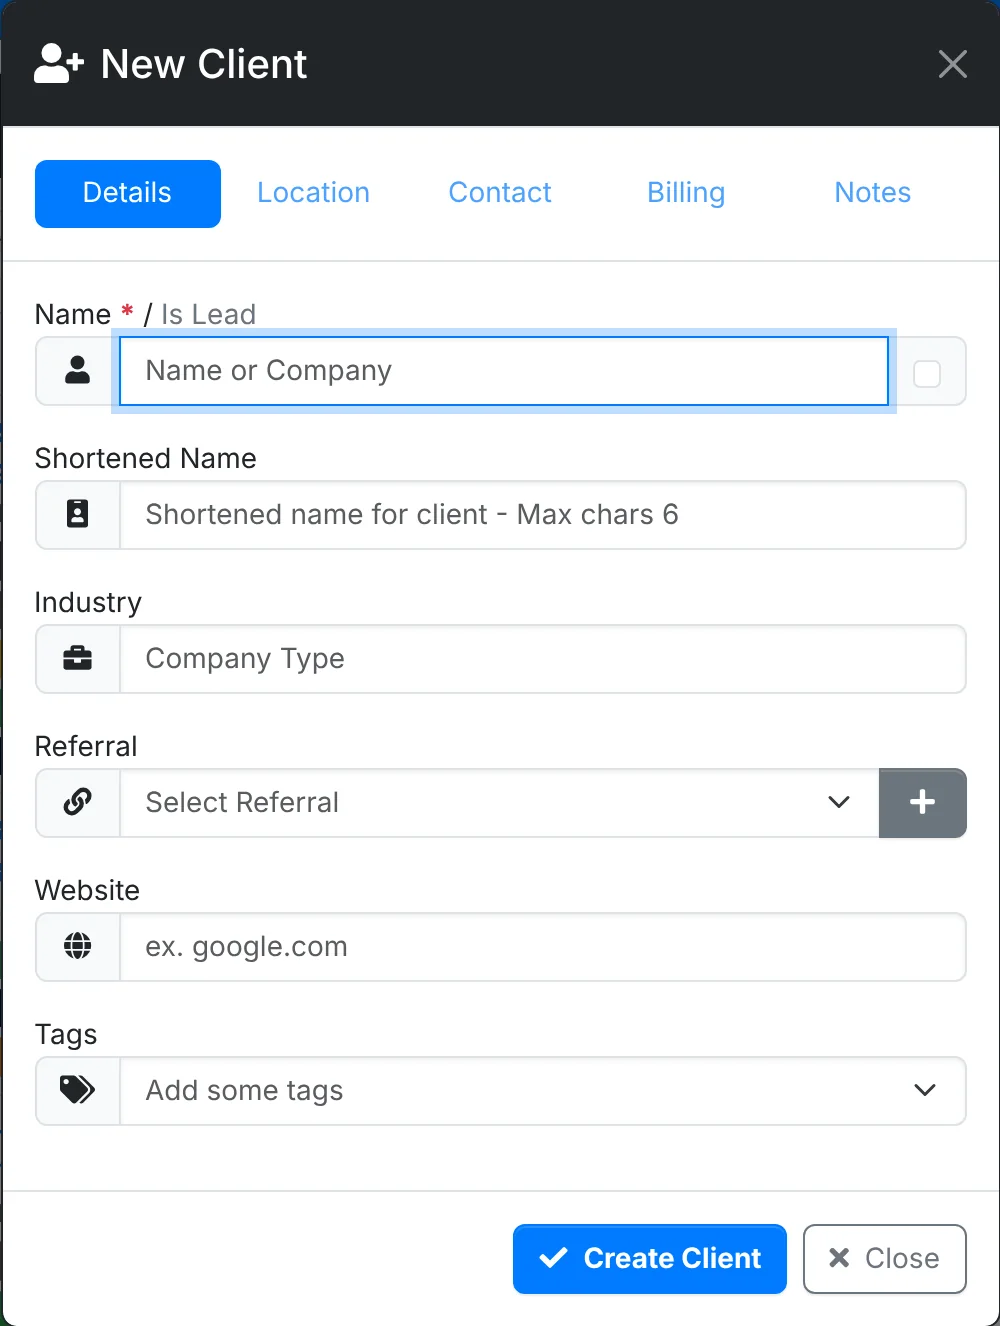
- Go to Clients and click New Client.
- On Details, type the client's Name. The rest is optional:
- Shortened Name - up to 6 letters, shown where space is tight. Without one, ITFlow uses the initials.
- Industry, Referral (where they came from), Website and Tags.
- Tick Is Lead, beside the name, if they aren't a client yet.
- On Location, add their main office's address and phone. It becomes their primary location.
- On Contact, add the main person you deal with. They become the primary contact.
- On Billing, pick a Contract template if you like, and set their tax and reminders (see below).
- Click Create Client.
You can add more locations and contacts afterwards. See Locations and Contacts.
Taking on a client properly? Onboard a client, under the arrow beside New Client, walks you through their sites, people, agreement, billing, domains, vendors, licenses and onboarding project a step at a time. See Onboarding a client.
Billing details
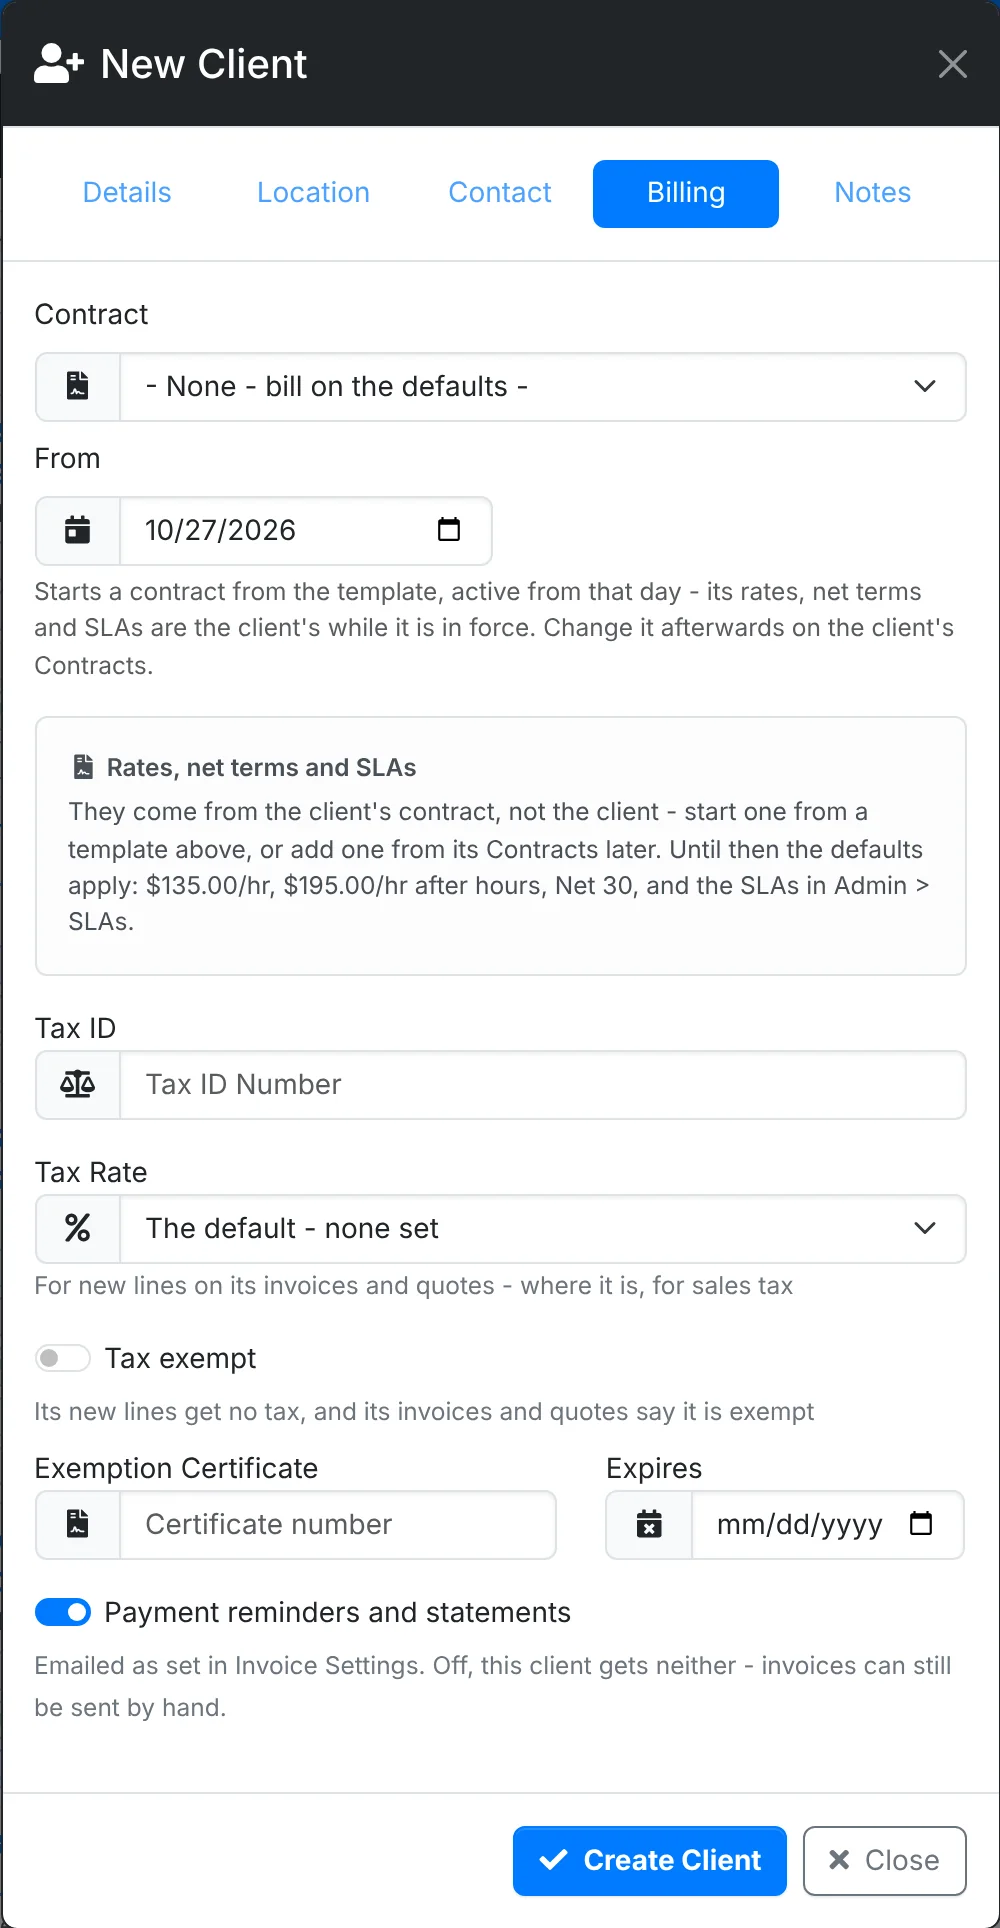
A client has no hourly rate, payment terms or SLAs of its own - they come from its contract, and your defaults cover the rest, from Admin > Settings > Defaults and Admin > SLAs. The Billing tab says what the client is billed on and where it comes from, with a link to its contracts. A new client is billed on your defaults until it has a contract.
- Contract - a contract template to start the client's contract from, and the day it's in force From - today, to start with. The contract is made active when the client is created, with the template's type, term, rates, net terms, SLAs and terms, the primary contact, and you to look after it. Leave it on None to bill on your defaults. You need Sales at Modify to see it.
- Tax ID - the client's own tax number, if they need it on invoices.
- Payment reminders and statements - switch off to leave this client out of automatic payment reminders and monthly statements. You can still send them by hand.
- Tax Rate - the tax their invoice lines start with, when it isn't your default.
- Tax exempt - for a client that doesn't pay tax, such as a charity or school, with their Exemption Certificate number and when it Expires. Their new lines start untaxed, and their invoices say they are exempt.
Change a client's details
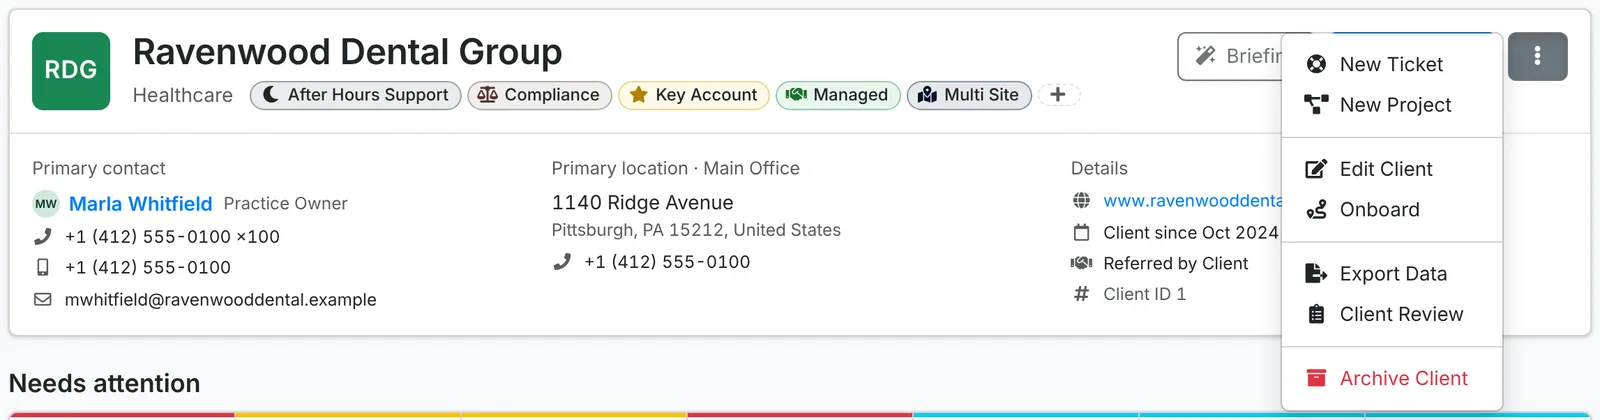
Open the client and click ⋮ in its header, then Edit Client. The Edit window has Details, Billing and Notes. New contract on Billing starts another contract from a template, from the day you pick. For what it sets, it comes first, ahead of the contract in force now - end that one from its page if the new one replaces it.
The same ⋮ menu has:
- New Ticket and New Project for this client
- Onboard - take the client on a step at a time, or Carry on onboarding. See Onboarding a client.
- Export Data - a documentation PDF or a full export. See Exporting a client's data.
- Client Review - a report of the client's quarter, made to print for a business review. See Reports.
- Archive Client
Do something for several clients
Tick the clients in the list and click Action. You can:
- Open Tickets - raise the same ticket for each of them, such as a quarterly check. Each ticket can go to the client's primary contact, and can start from a ticket template.
- Send Email - email them, with your logo and details around what you write.
- Tags, Set Industry and Set Referral
- Start Contract - a contract from a template for each of them, active from the day you pick
- Archive
Archive a client
When you stop working with a client, archive them rather than deleting them. An archived client drops out of the lists and menus, but everything you had for them - tickets, invoices, documentation - is kept, and their contacts can no longer sign in to the client portal. Their contracts are left as they are - not renewed, ended or reminded of overnight - and a contract out for them to sign is withdrawn.
Open the client, click ⋮ > Archive Client and confirm. To see archived clients, click Archived on the clients list. Restore is in each one's ⋮ menu, and in the header menu of an archived client.