After installing
Get started takes you through what's left once ITFlow is installed - cron, email, backups, billing, support, your team, starter content and a first client.
ITFlow is running, but some of it is switched off until you set it up. The first time an admin signs in after setup, Get started opens and goes through it with you, a step at a time:
- Cron - turn on ITFlow's background work
- Email - the mailbox ITFlow sends from, and a support mailbox to turn into tickets
- Backups - your backup key, and a backup every night
- Billing - your hourly rate, tax, and invoice and quote numbers
- Support - business hours, response times and ticket numbers
- Your team - the people who work with you
- Starter content - templates to start from
- Your first client - or the demo data, to look around first
How Get started works
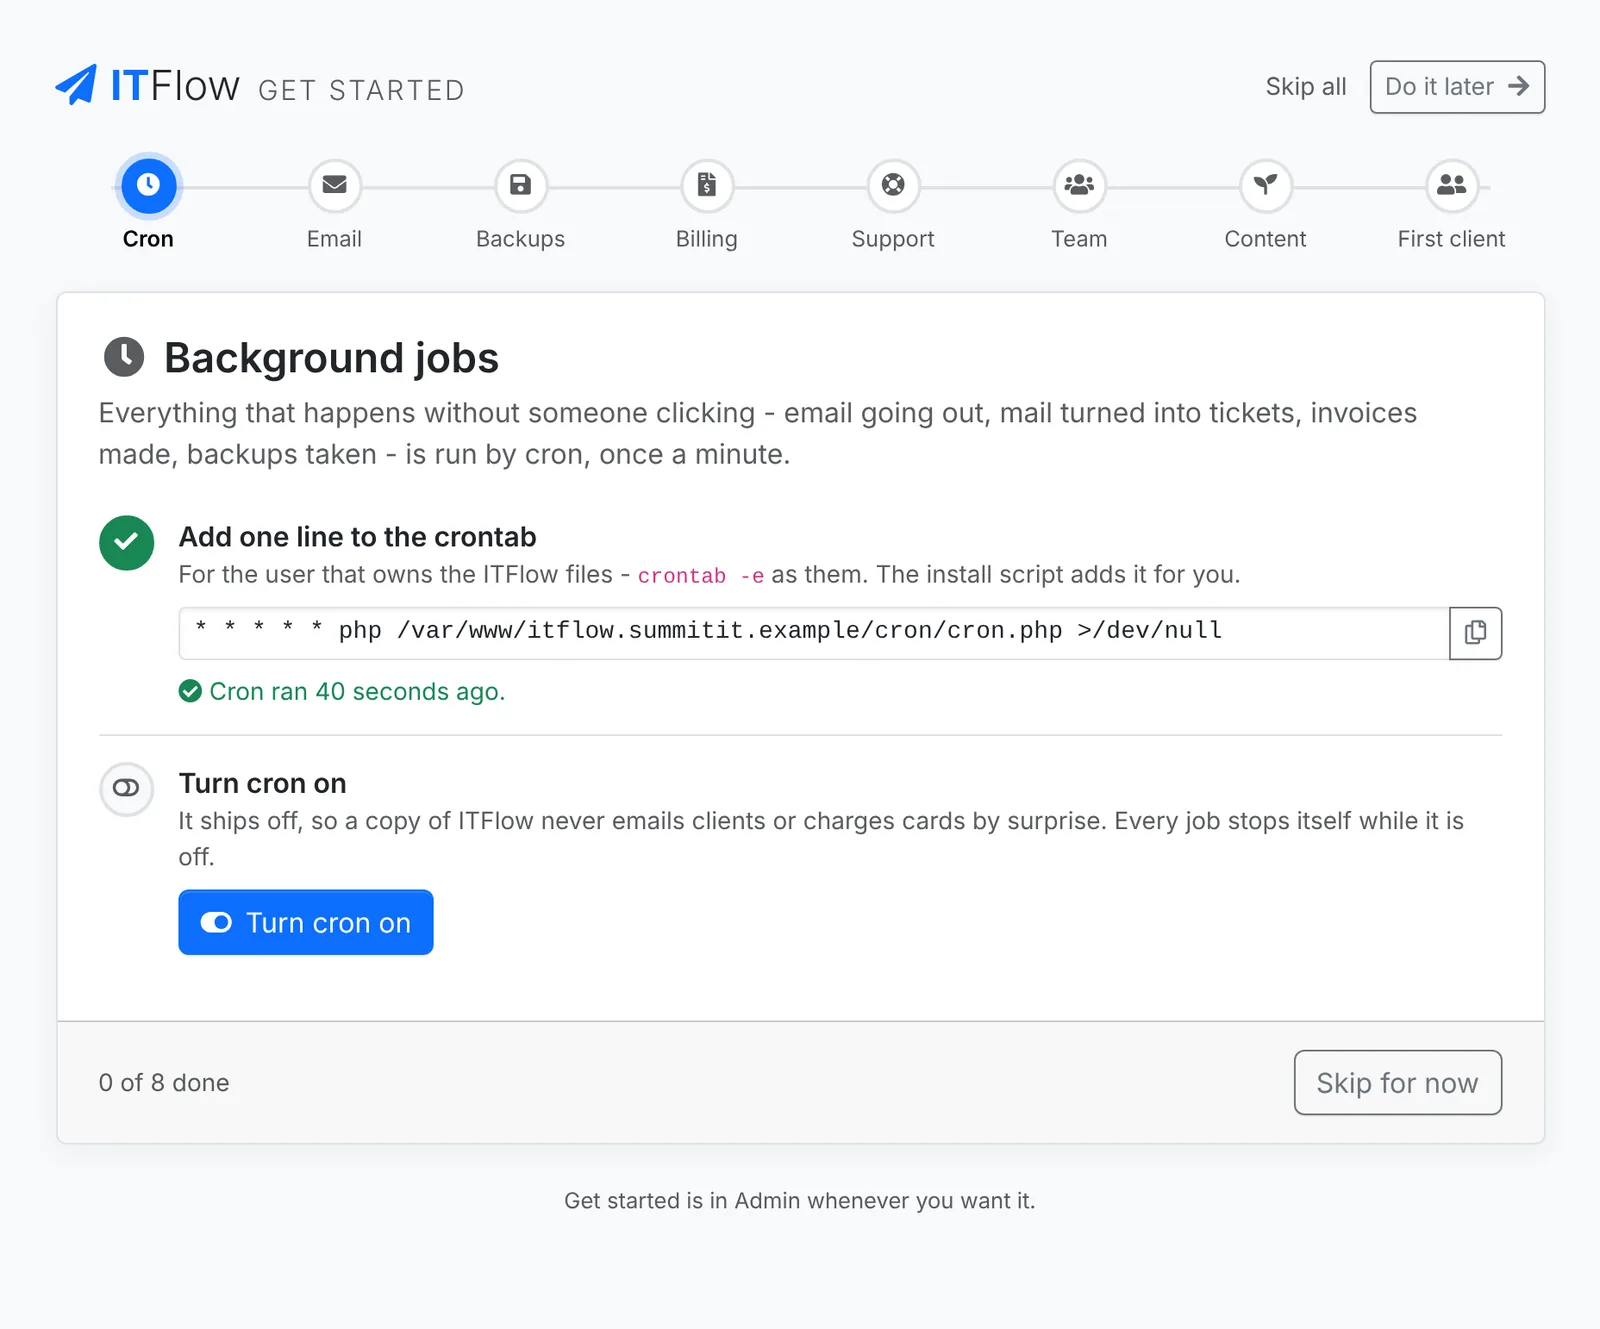
- The steps run along the top. Click any of them to go straight to it.
- Each step is a short form. Save and continue saves it and goes on to the next.
- Skip for now leaves a step for later. On Your team it's It's just me.
- A step ticks itself off once what it's about is set up - here, or on its own settings page. A step you skipped shows a dash until then.
- Do it later, at the top, leaves at any time. What you've saved stays saved, and the dashboard shows what's left to carry on from.
- Skip all, beside it, skips every step that's still to do, once you say yes, and the dashboard stops showing it. Each step is still in Admin > Get started, and doing one there ticks it off.
Billing only shows while invoicing is turned on, and Support while ticketing is, in Admin > Settings > Modules.
Get started opens by itself once, for the first admin to sign in to a new install. An install updated from an earlier version doesn't open it, and neither does one set up from the command line with --skip-get-started (see Set up from the command line). Open it yourself from Admin > Get started, at the top of the Administration menu.
Cron
Cron runs ITFlow's background work: sending email, turning email into tickets, watching SLAs, making recurring invoices and tickets, and backups. It needs one line in the crontab of the user that owns ITFlow's files. The install script adds it for you. If you're adding it by hand, the step shows the line for your server, with a copy button. On a hosting control panel such as Jabali, HestiaCP or cPanel, add it as a cron job that runs every minute.
Once cron has run, the step says when - Cron ran 40 seconds ago. Until then it waits, and checks again every few seconds by itself.
Cron is on in a new install, so its jobs start as soon as the cron job runs. If someone has switched it off in Admin > Cron, the step shows Turn cron on.
Cron describes each job.
ITFlow needs a mailbox to send from: ticket updates, invoices, quotes and alerts.
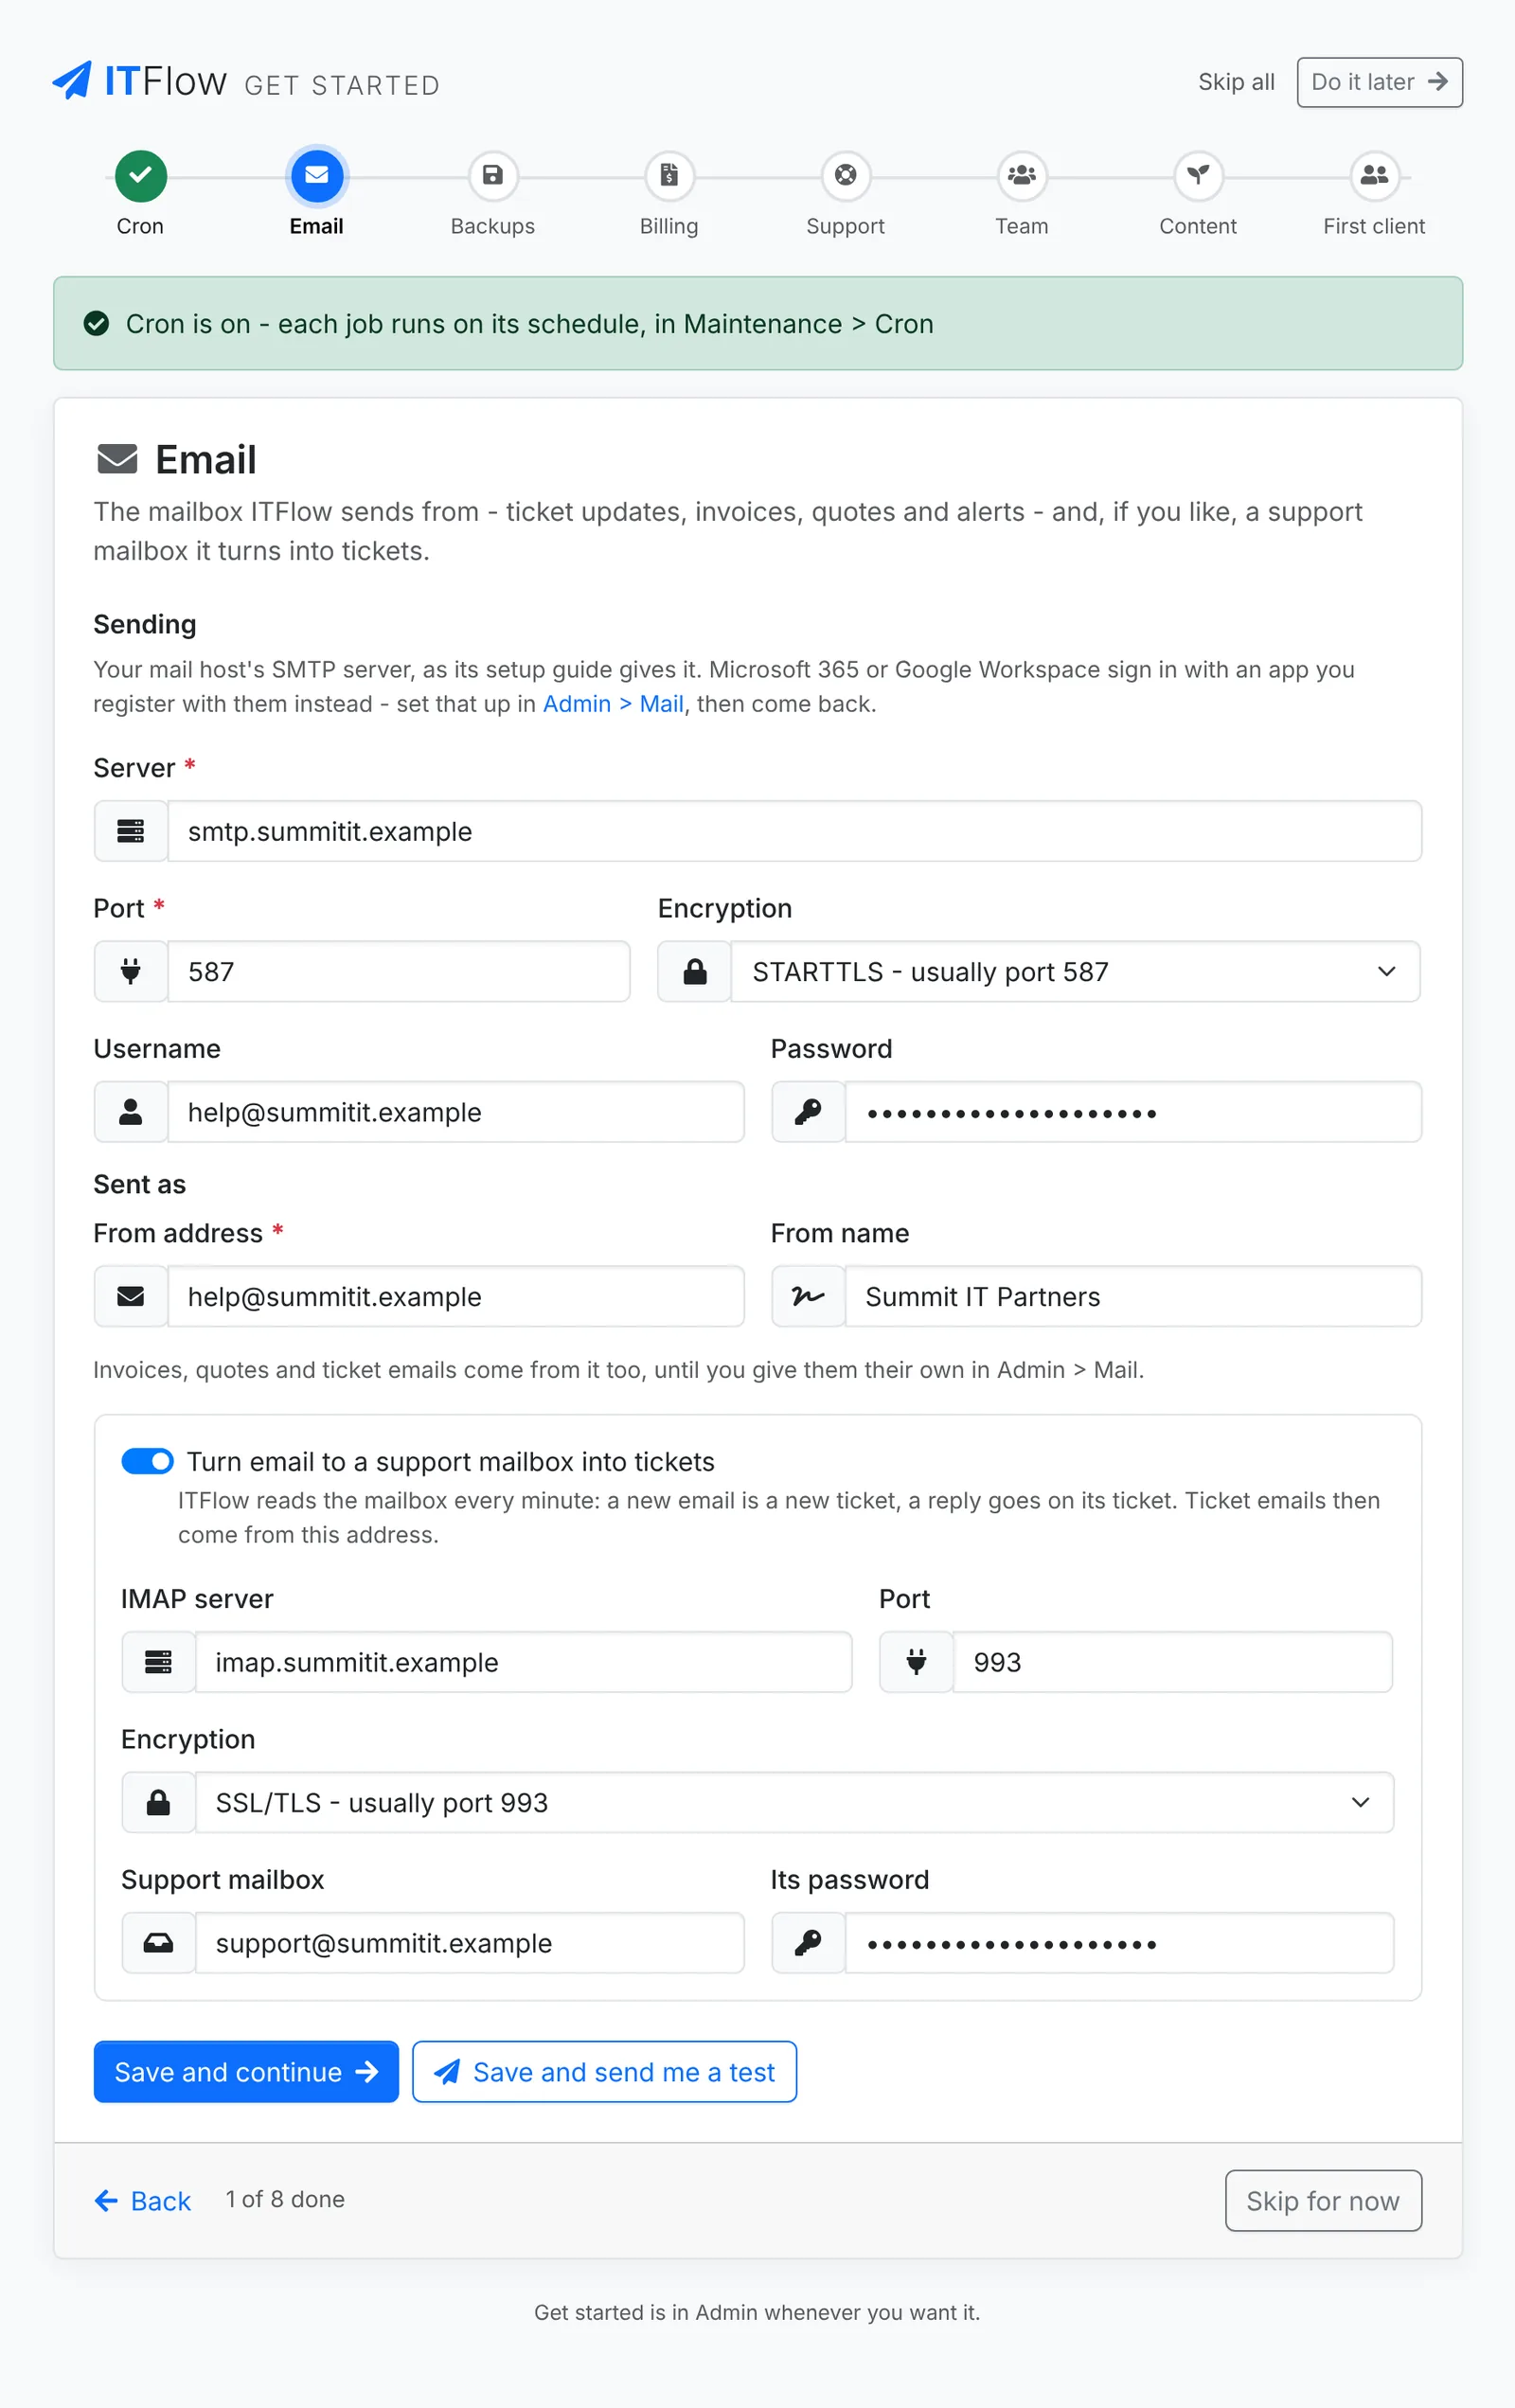
- Under Sending, give your mail host's SMTP Server, Port, Encryption, Username and Password, as its setup guide gives them.
- Under Sent as, give the From address and From name clients see. Invoices, quotes and ticket emails come from it too, until you give them their own in Admin > Settings > Mail.
- To turn email into tickets, switch on Turn email to a support mailbox into tickets and give the mailbox's IMAP server, Port, Encryption, the Support mailbox and Its password. ITFlow reads it every minute: a new email is a new ticket, and a reply goes on its ticket.
Save and continue saves it. Save and send me a test saves it and emails you a test once cron is running - the mail queue shows how it went.
Microsoft 365 and Google Workspace sign in with an app you register with them, rather than a password. Set that up in Admin > Settings > Mail first, then come back. The step keeps it and only asks for the address to send as.
Backups
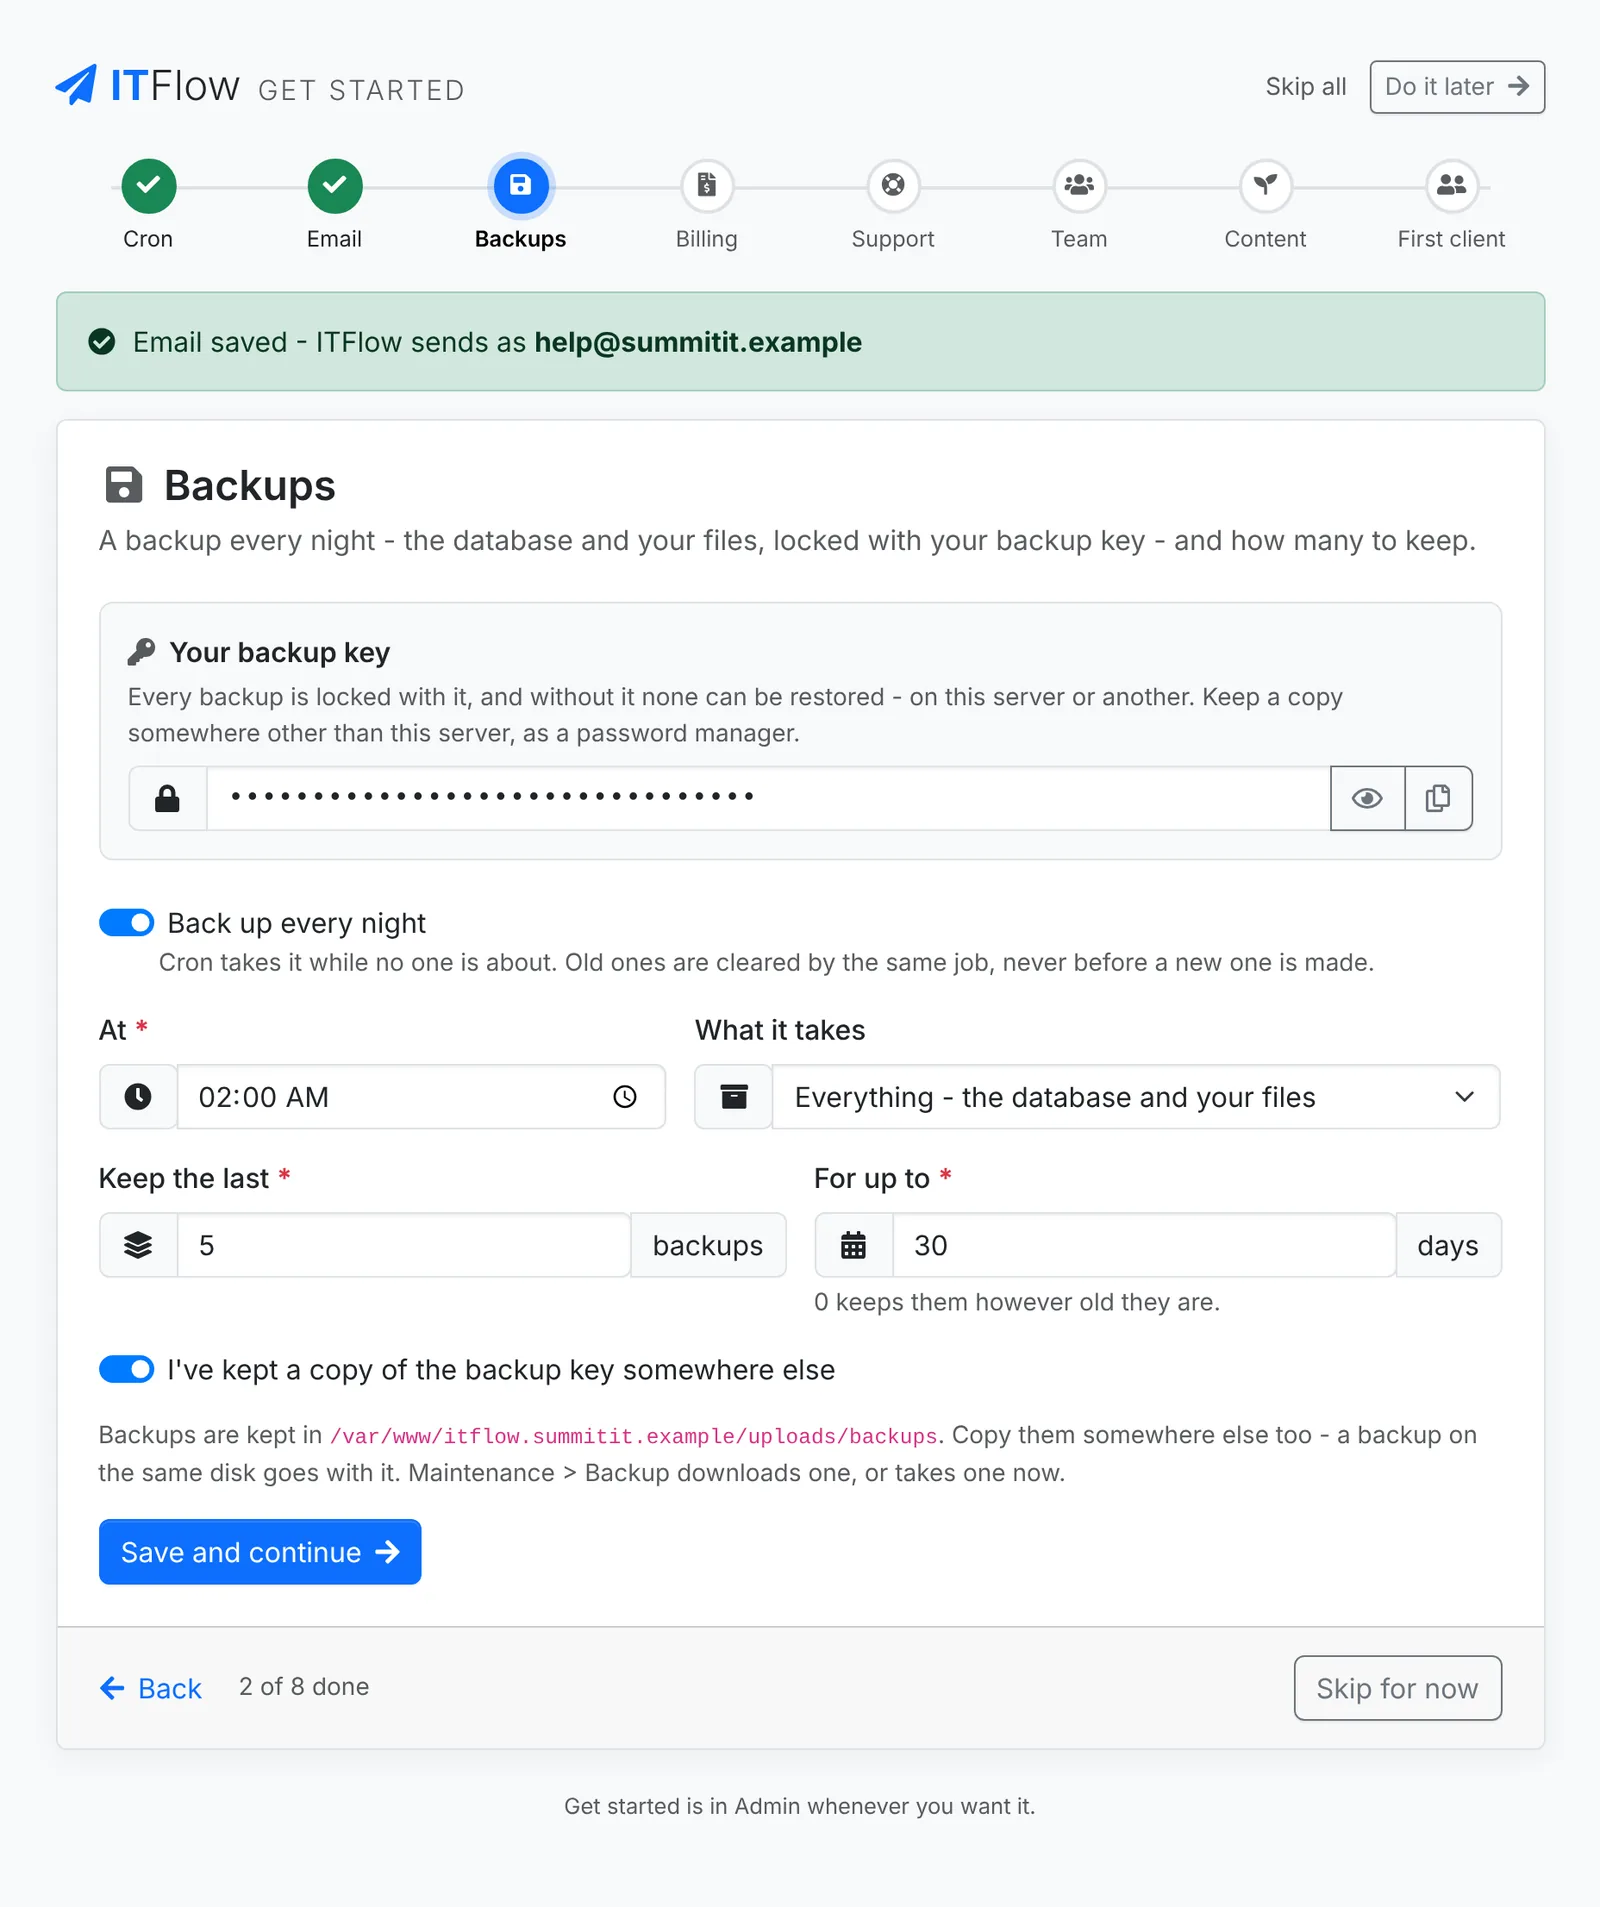
Your backup key
Every backup is locked with a key. Without it, nobody can restore a backup. Not you, and not the ITFlow project.
Setup showed you the key on its last step. The Backups step shows it again, hidden: click the eye to see it, or copy it. Keep it in your password manager, or somewhere else away from this server. It's in Admin > Backup too.
A backup every night
Back up every night is on. Choose:
- At - the time cron takes it, while no one is about
- What it takes - Everything (the database and your files), or The database only
- Keep the last so many backups, For up to so many days. 0 days keeps them however old they are. The same job clears old ones, and never before a new one is made.
Switch on I've kept a copy of the backup key somewhere else, then click Save and continue. Backups aren't turned on until you have.
Backups are kept on the server, in ITFlow's uploads/backups folder. Copy them somewhere else too - a backup on the same disk is lost with it. A snapshot of the whole VM is even better.
Billing
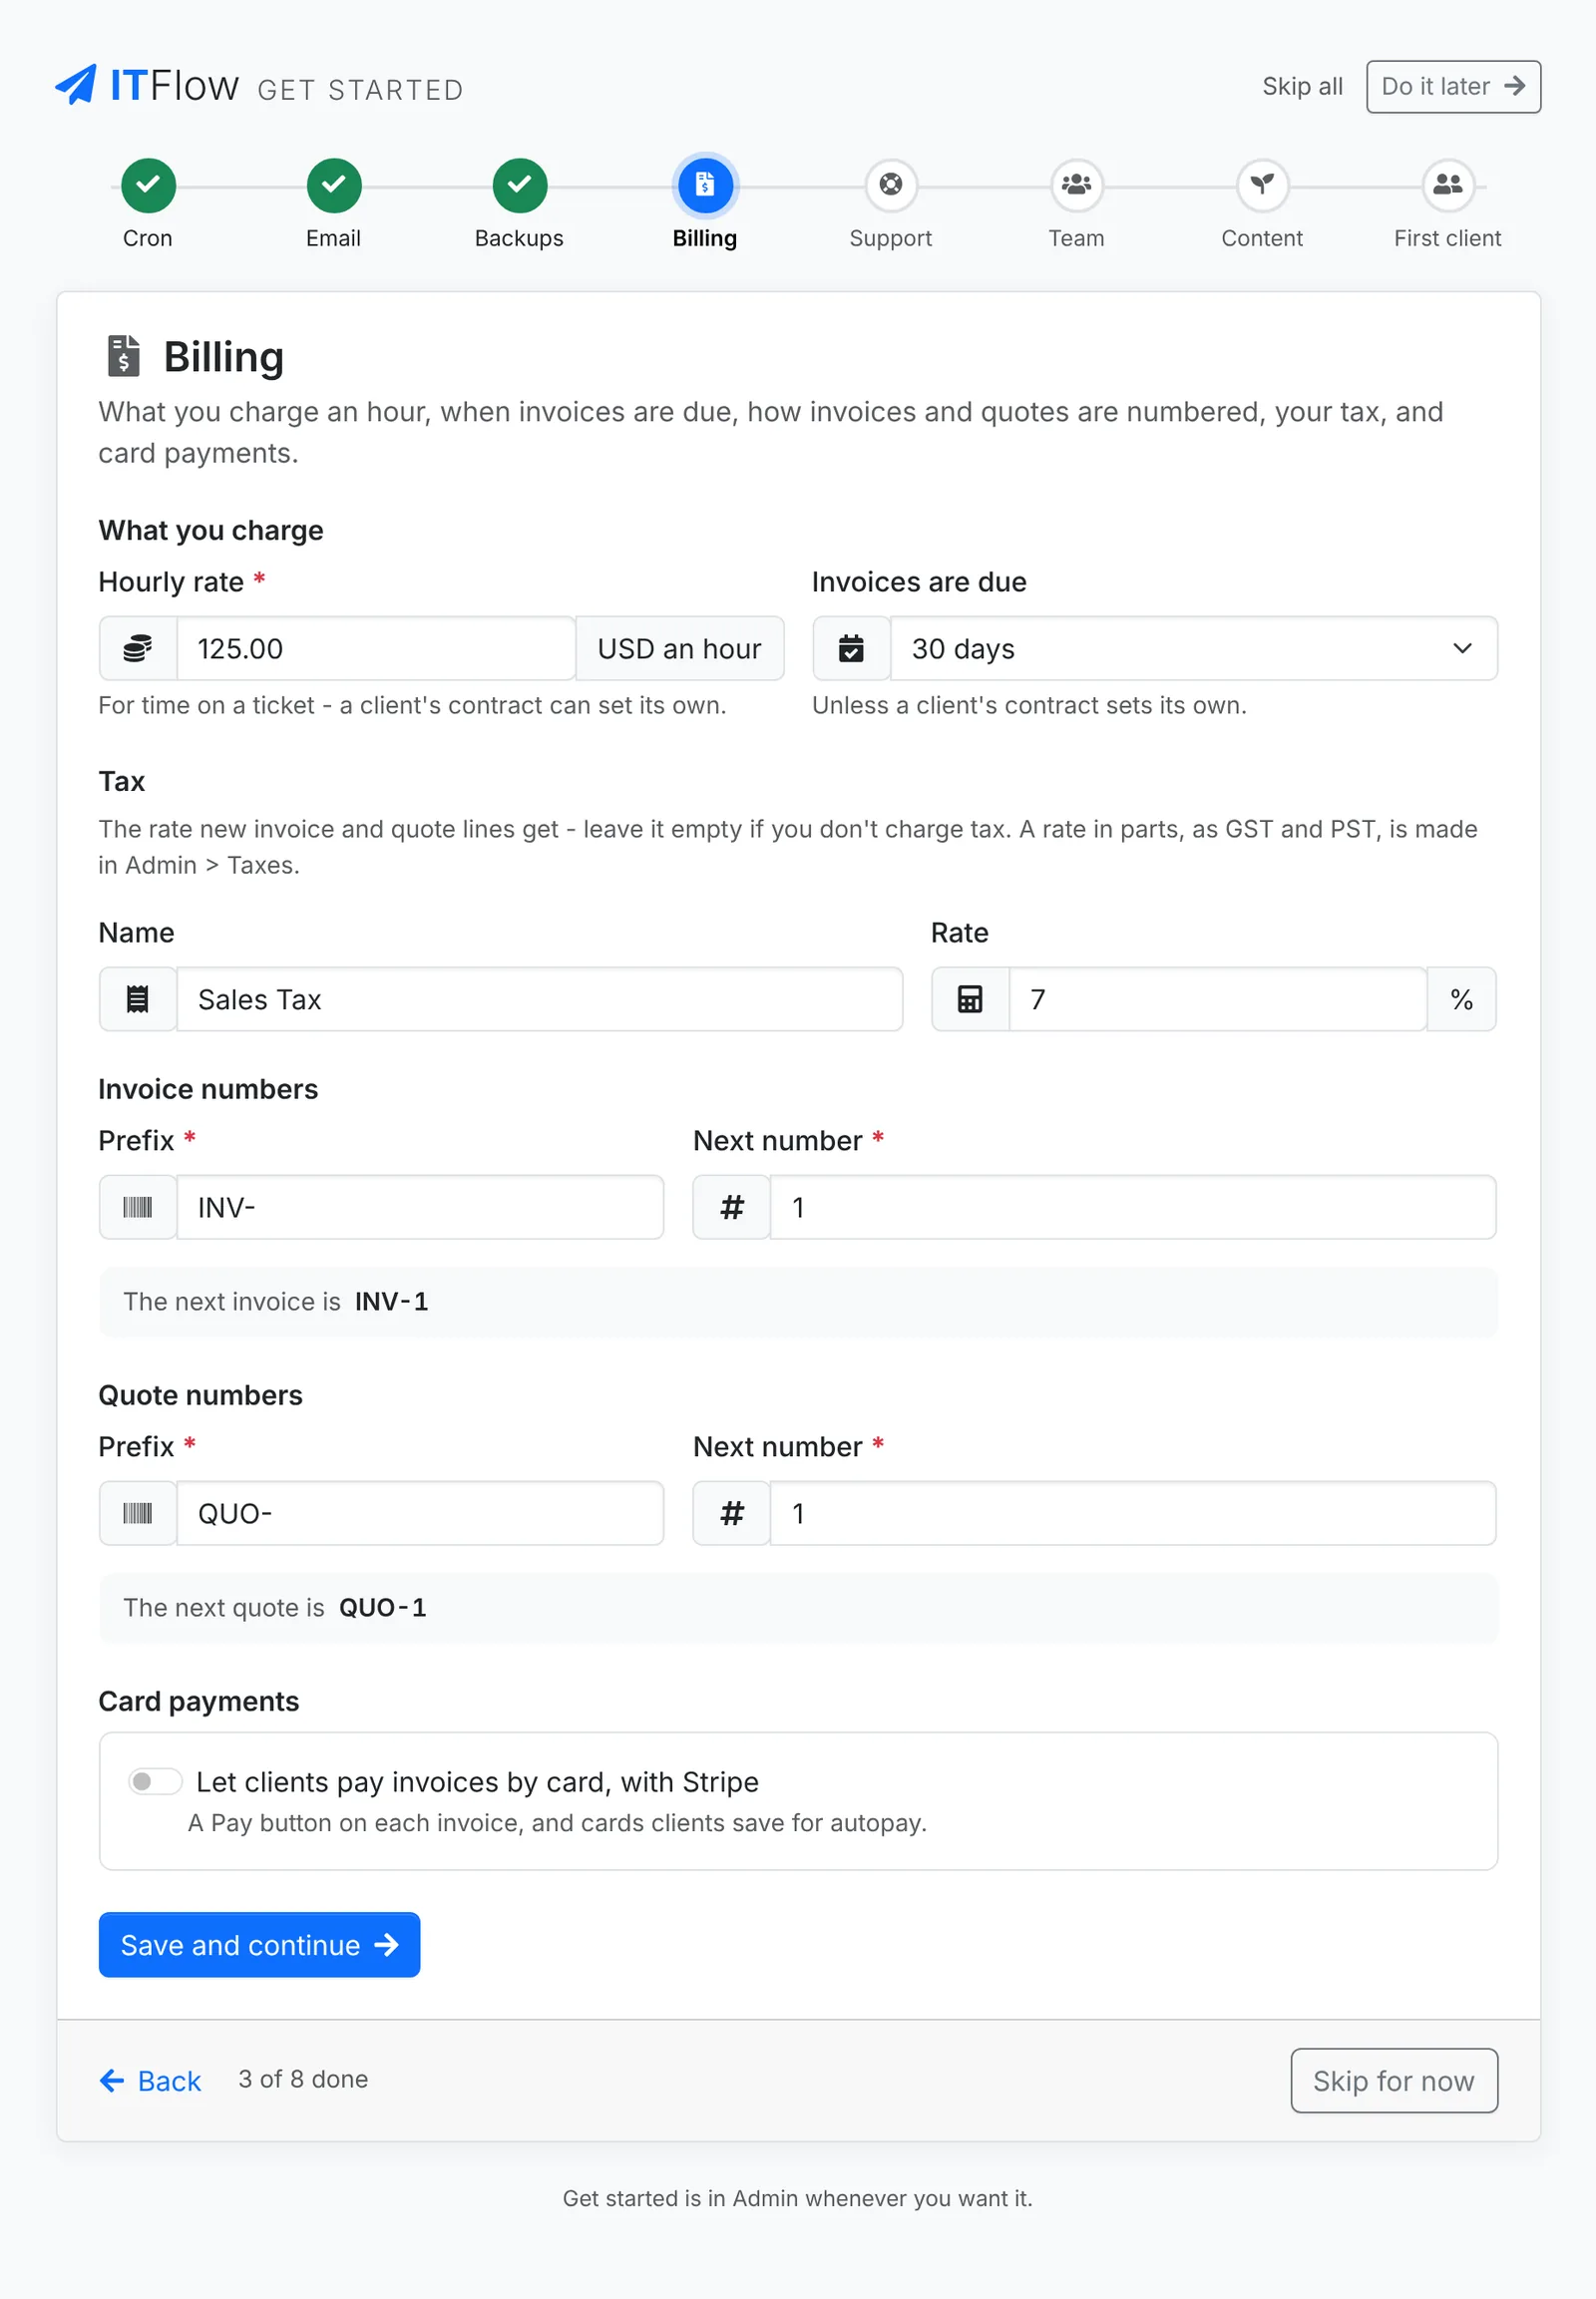
- Hourly rate - what you charge for time on a ticket. A client's contract can set its own.
- Invoices are due - your payment terms, unless a client's contract sets its own.
- Tax - the rate new invoice and quote lines get, as a Name and a Rate. Leave it empty if you don't charge tax. A rate in parts, such as GST and PST, is made in Admin > Taxes. Once you have a default rate, the step just shows it.
- Invoice numbers and Quote numbers - the Prefix and Next number, with how the next one will look.
- Card payments - switch on Let clients pay invoices by card, with Stripe and give your Stripe keys and the account payments go into. Every invoice gets a Pay button, and clients can save cards for autopay. Test keys work too. See Card payments with Stripe.
Support
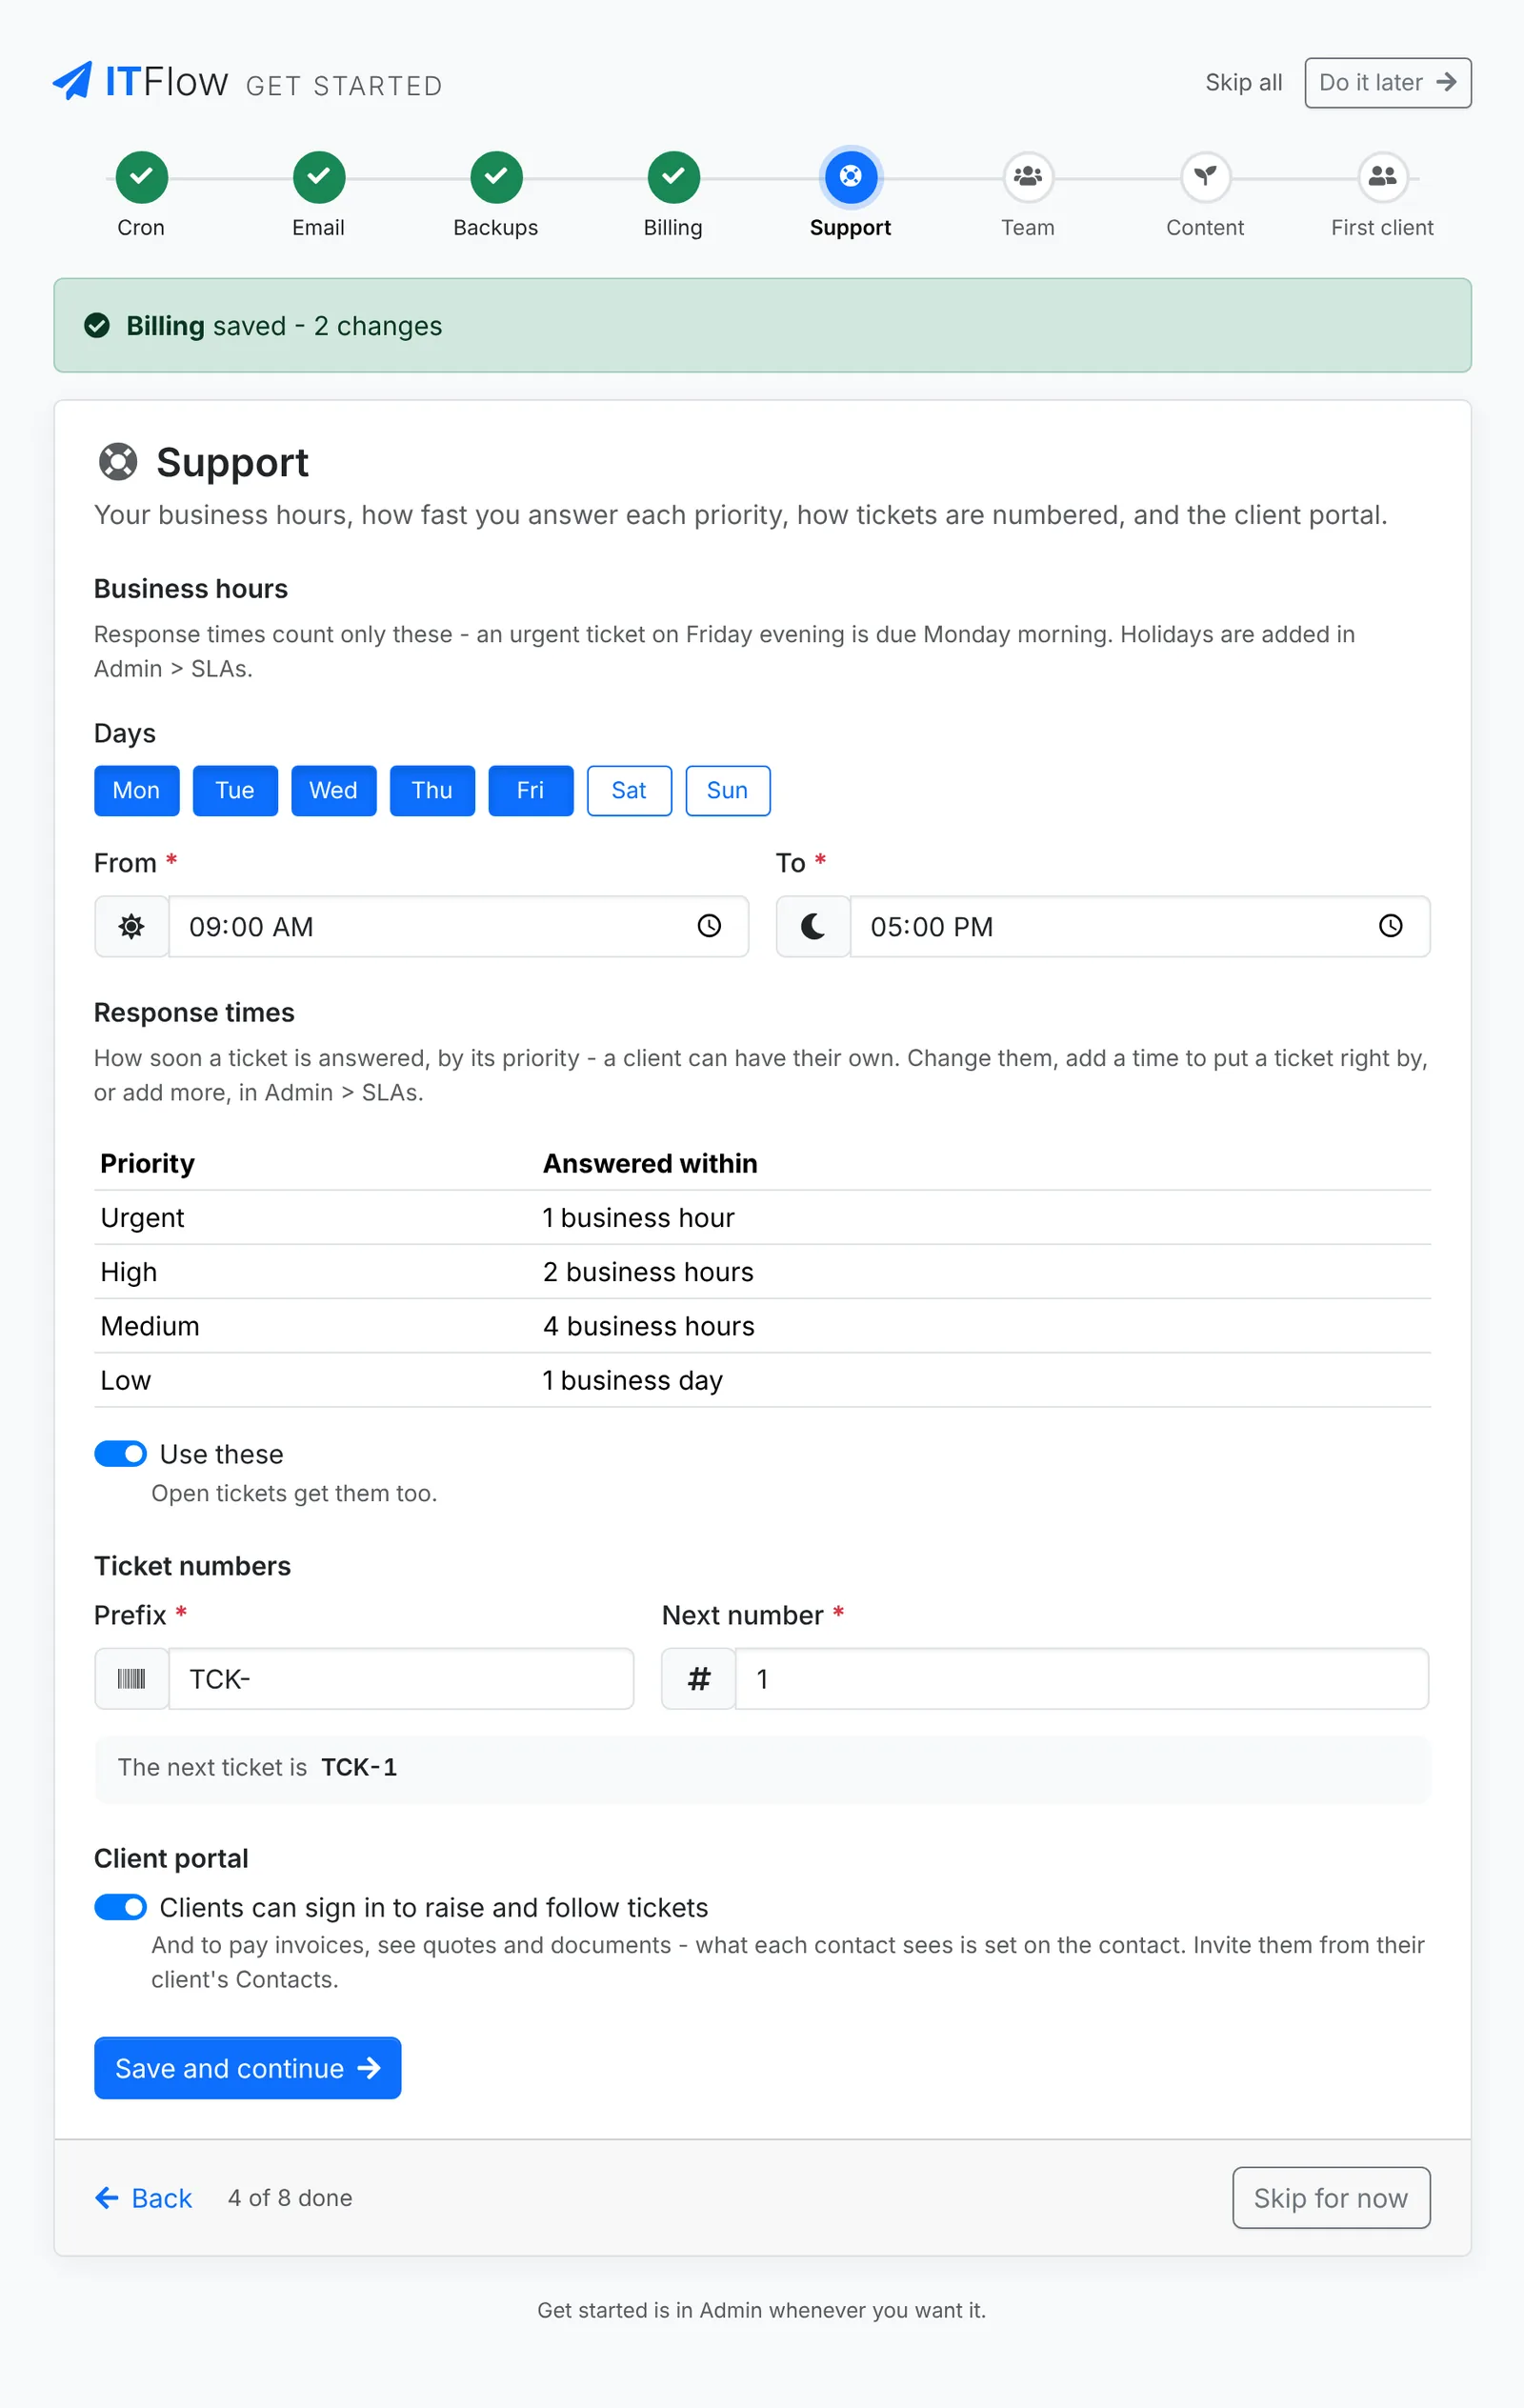
- Business hours - the Days, and the hours From and To. Response times only count these: an urgent ticket on Friday evening is due Monday morning. Add holidays in Admin > SLAs.
- Response times - how soon a ticket is answered, by its priority. Use these makes them your default SLAs, for every client without their own, and gives them to open tickets too.
- Ticket numbers - the Prefix and Next number.
- Client portal - switch on Clients can sign in to raise and follow tickets. They can also pay invoices and see quotes and documents. What each contact sees is set on the contact - see Giving contacts access.
The standard response times are:
| Priority | Answered within |
|---|---|
| Urgent | 1 business hour |
| High | 2 business hours |
| Medium | 4 business hours |
| Low | 1 business day |
They have no time to resolve a ticket by. To add one - or change them, or add more SLAs - go to Admin > SLAs.
If you already have default SLAs, the step shows yours - with their time to resolve by, when they have one - and only fills in the priorities that have none.
Your team
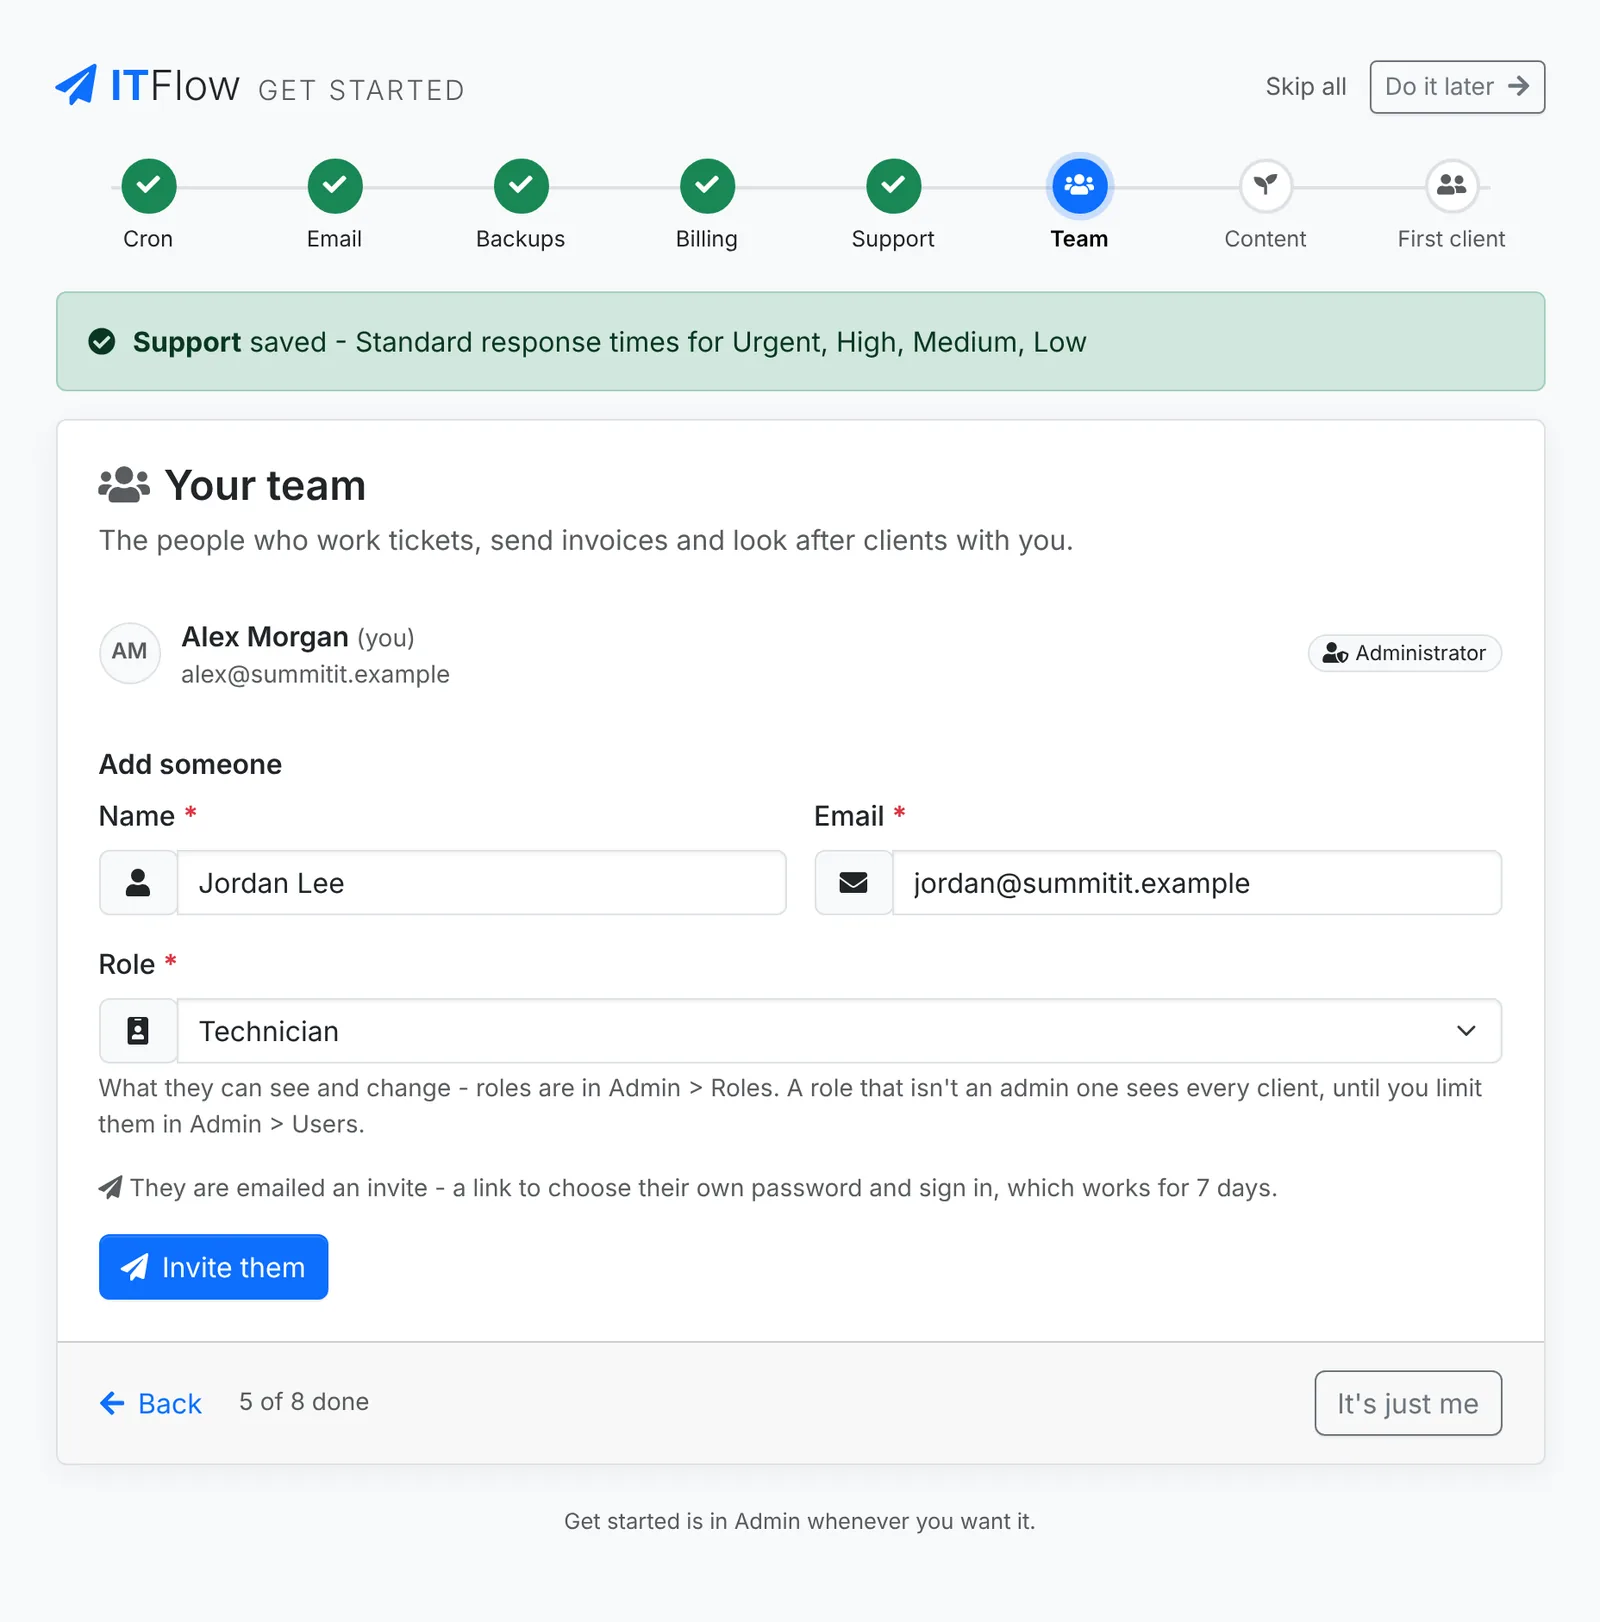
The step lists who can sign in now, and who is invited. To add someone, give their Name, Email and Role, and click Invite them. Add as many people as you like, one at a time.
- With email set up, they're emailed an invite, once cron is running - a link to choose their own password and join. See Invite someone.
- Without email, the button is Add them: ITFlow makes their password and shows it to you once - give it to them to sign in with, and they change it.
- Role decides what they can see and change. Most people are Technician. See Roles and permissions.
- A role that isn't an admin one sees every client, until you limit them in Admin > Users.
Working on your own? Click It's just me.
Starter content
Starter content is a library of ready-made categories, tags, ticket and project templates, canned responses, vendor and document templates, products and license templates for a typical MSP.
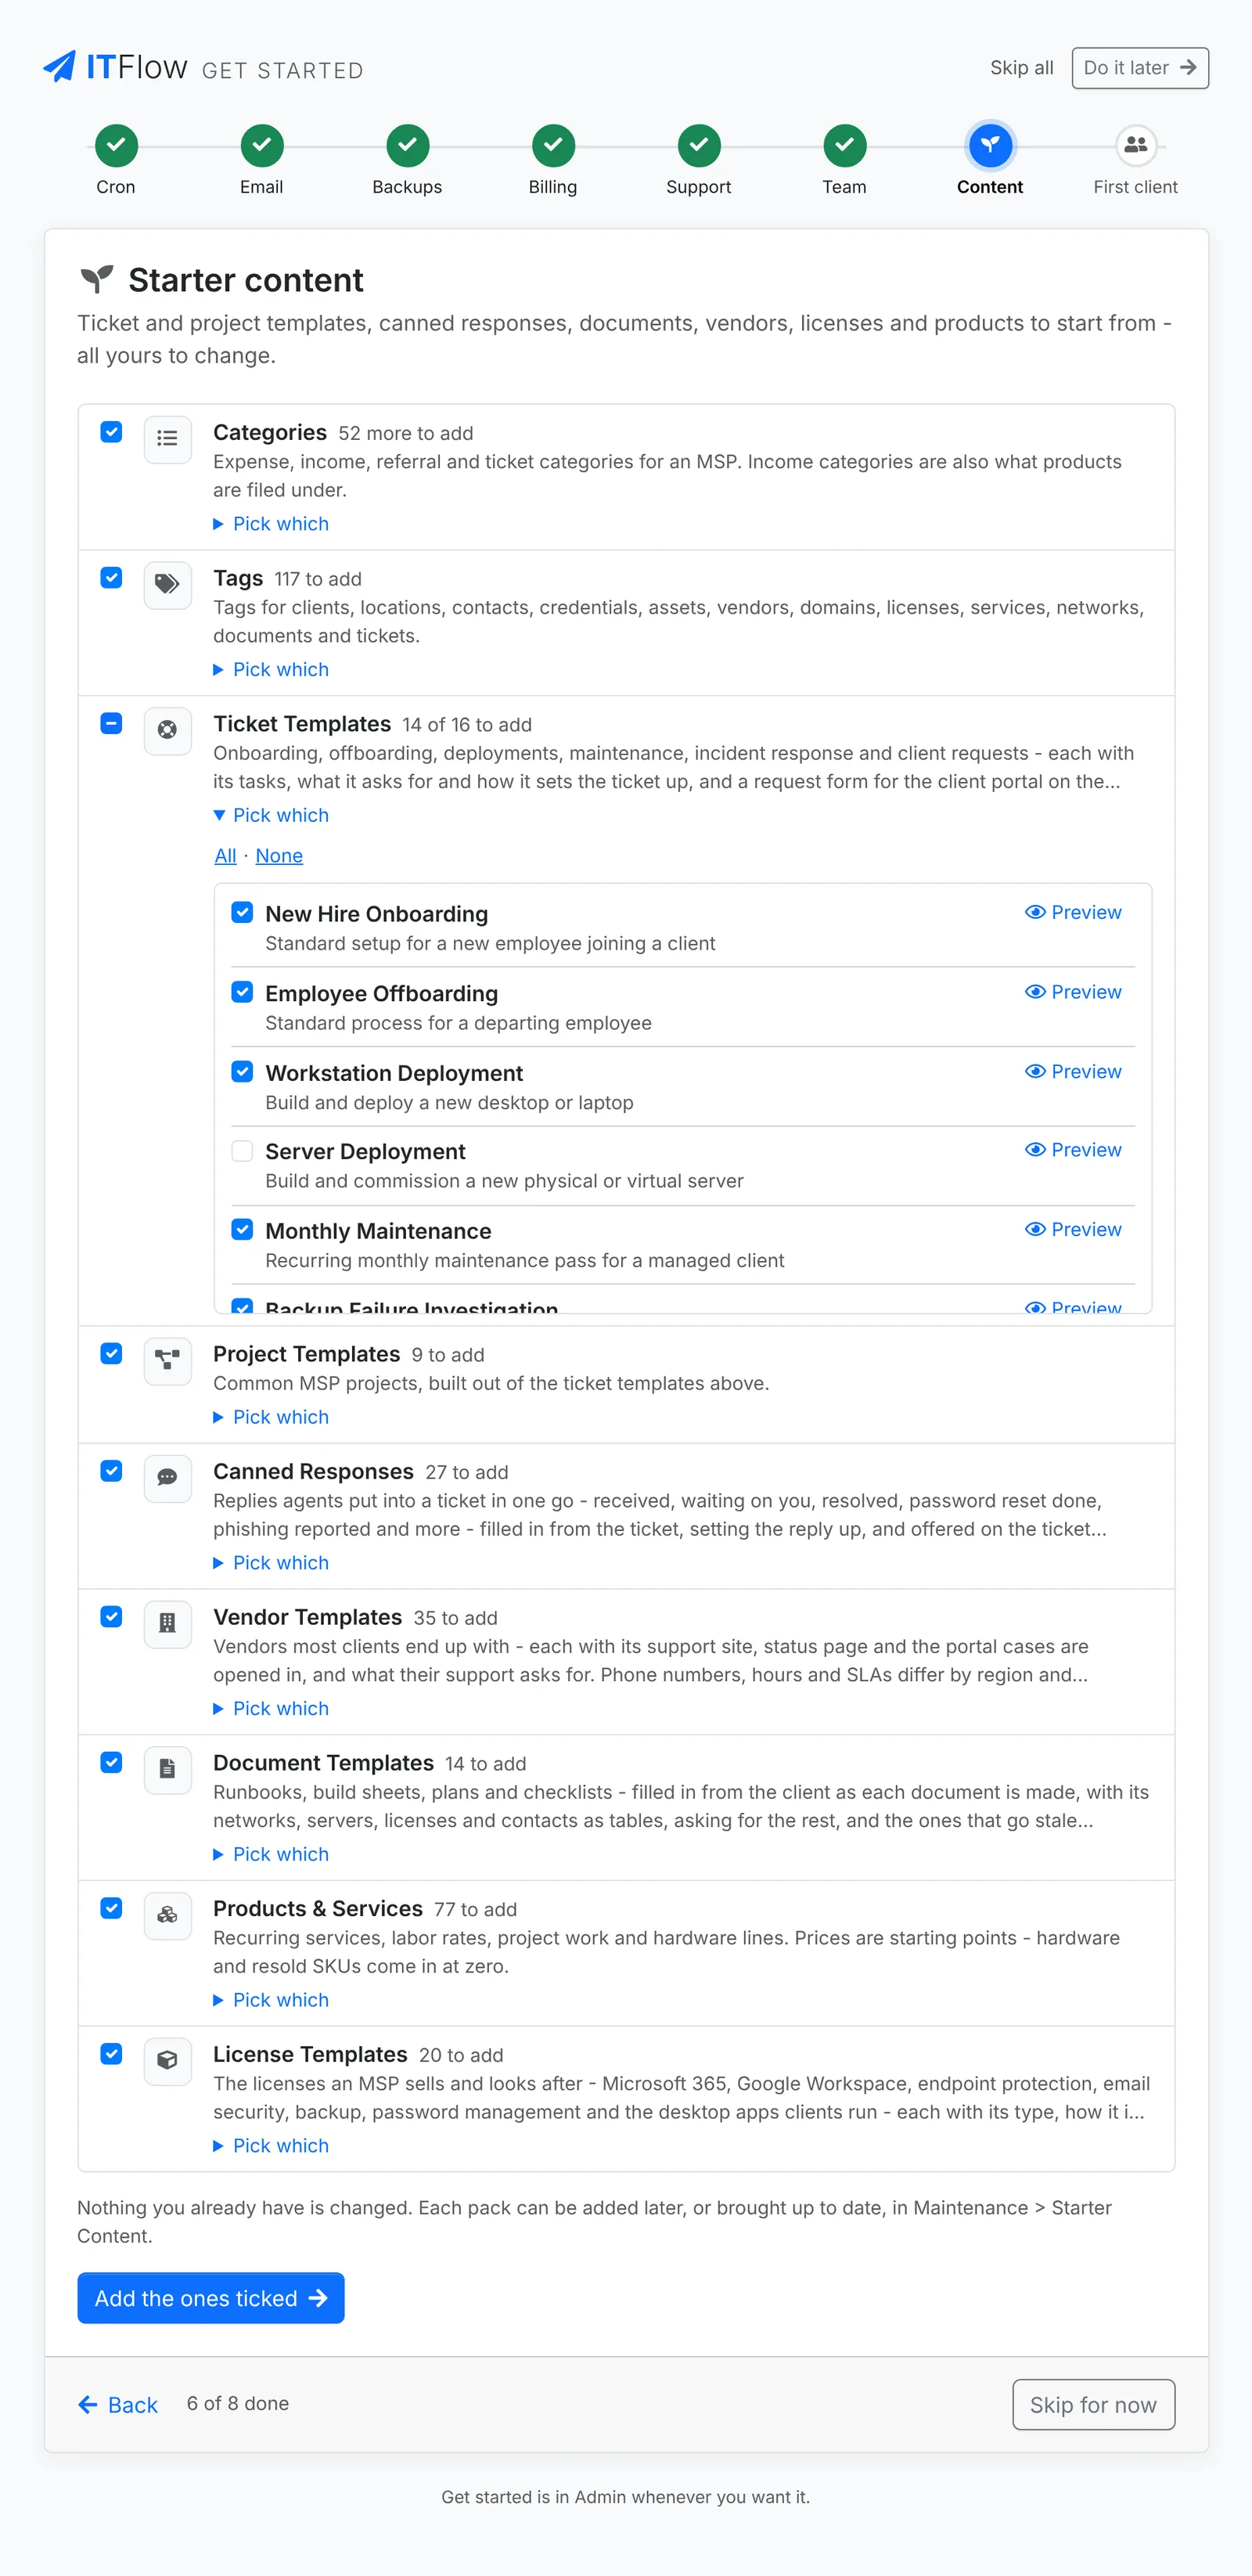
Each pack shows how much it would add, and is ticked to add.
- Untick a pack to leave it out.
- Pick which, under a pack, lists what it would add, each as it will look, all ticked. Untick any you don't want - the pack's count follows - or use All and None. Preview shows a template in full.
- Click Add the ones ticked.
Adding never changes anything you already have. Any pack can be added later, or brought up to date, in Admin > Starter Content.
Your first client
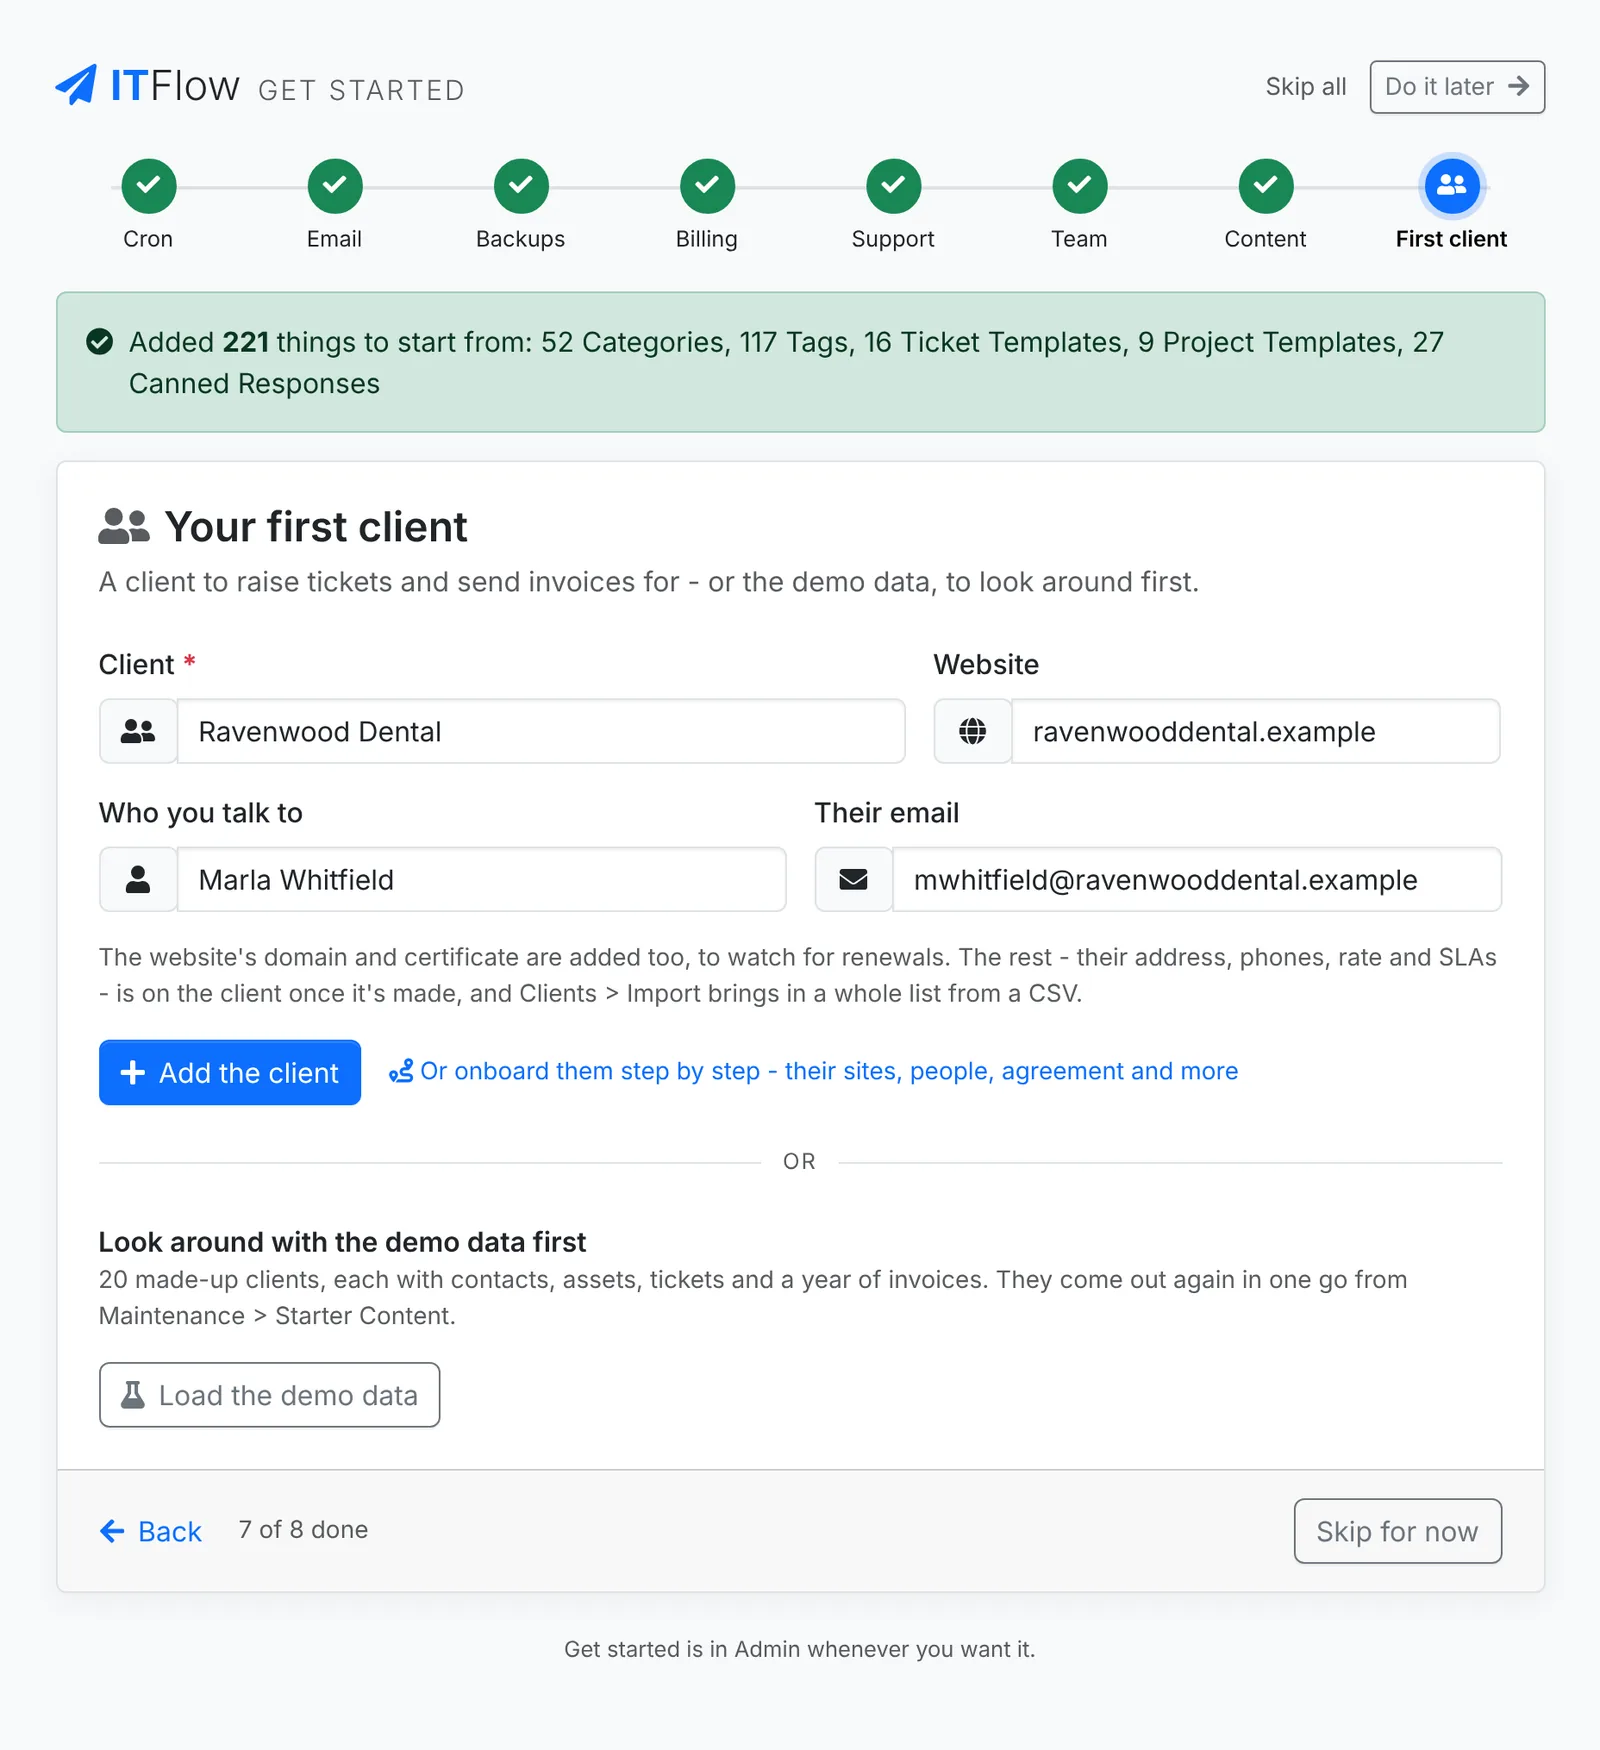
Give the Client name and, if you like, their Website, Who you talk to and Their email. Then click Add the client. The website's domain and certificate are added too, to watch for renewals. The rest - their address, phones, rate and SLAs - is on the client once it's made. See Add a client.
Or click Or onboard them step by step to take them on properly - their sites, people, agreement, billing and more, a step at a time. The step is done once the client is made. See Onboarding a client.
Or click Load the demo data to look around first: 20 made-up clients, each with contacts, assets, tickets and a year of invoices. They come out again in one go from Admin > Starter Content.
Where it stands
After the last step, Get started shows every step and where it stands. Change or Set up goes back to one.
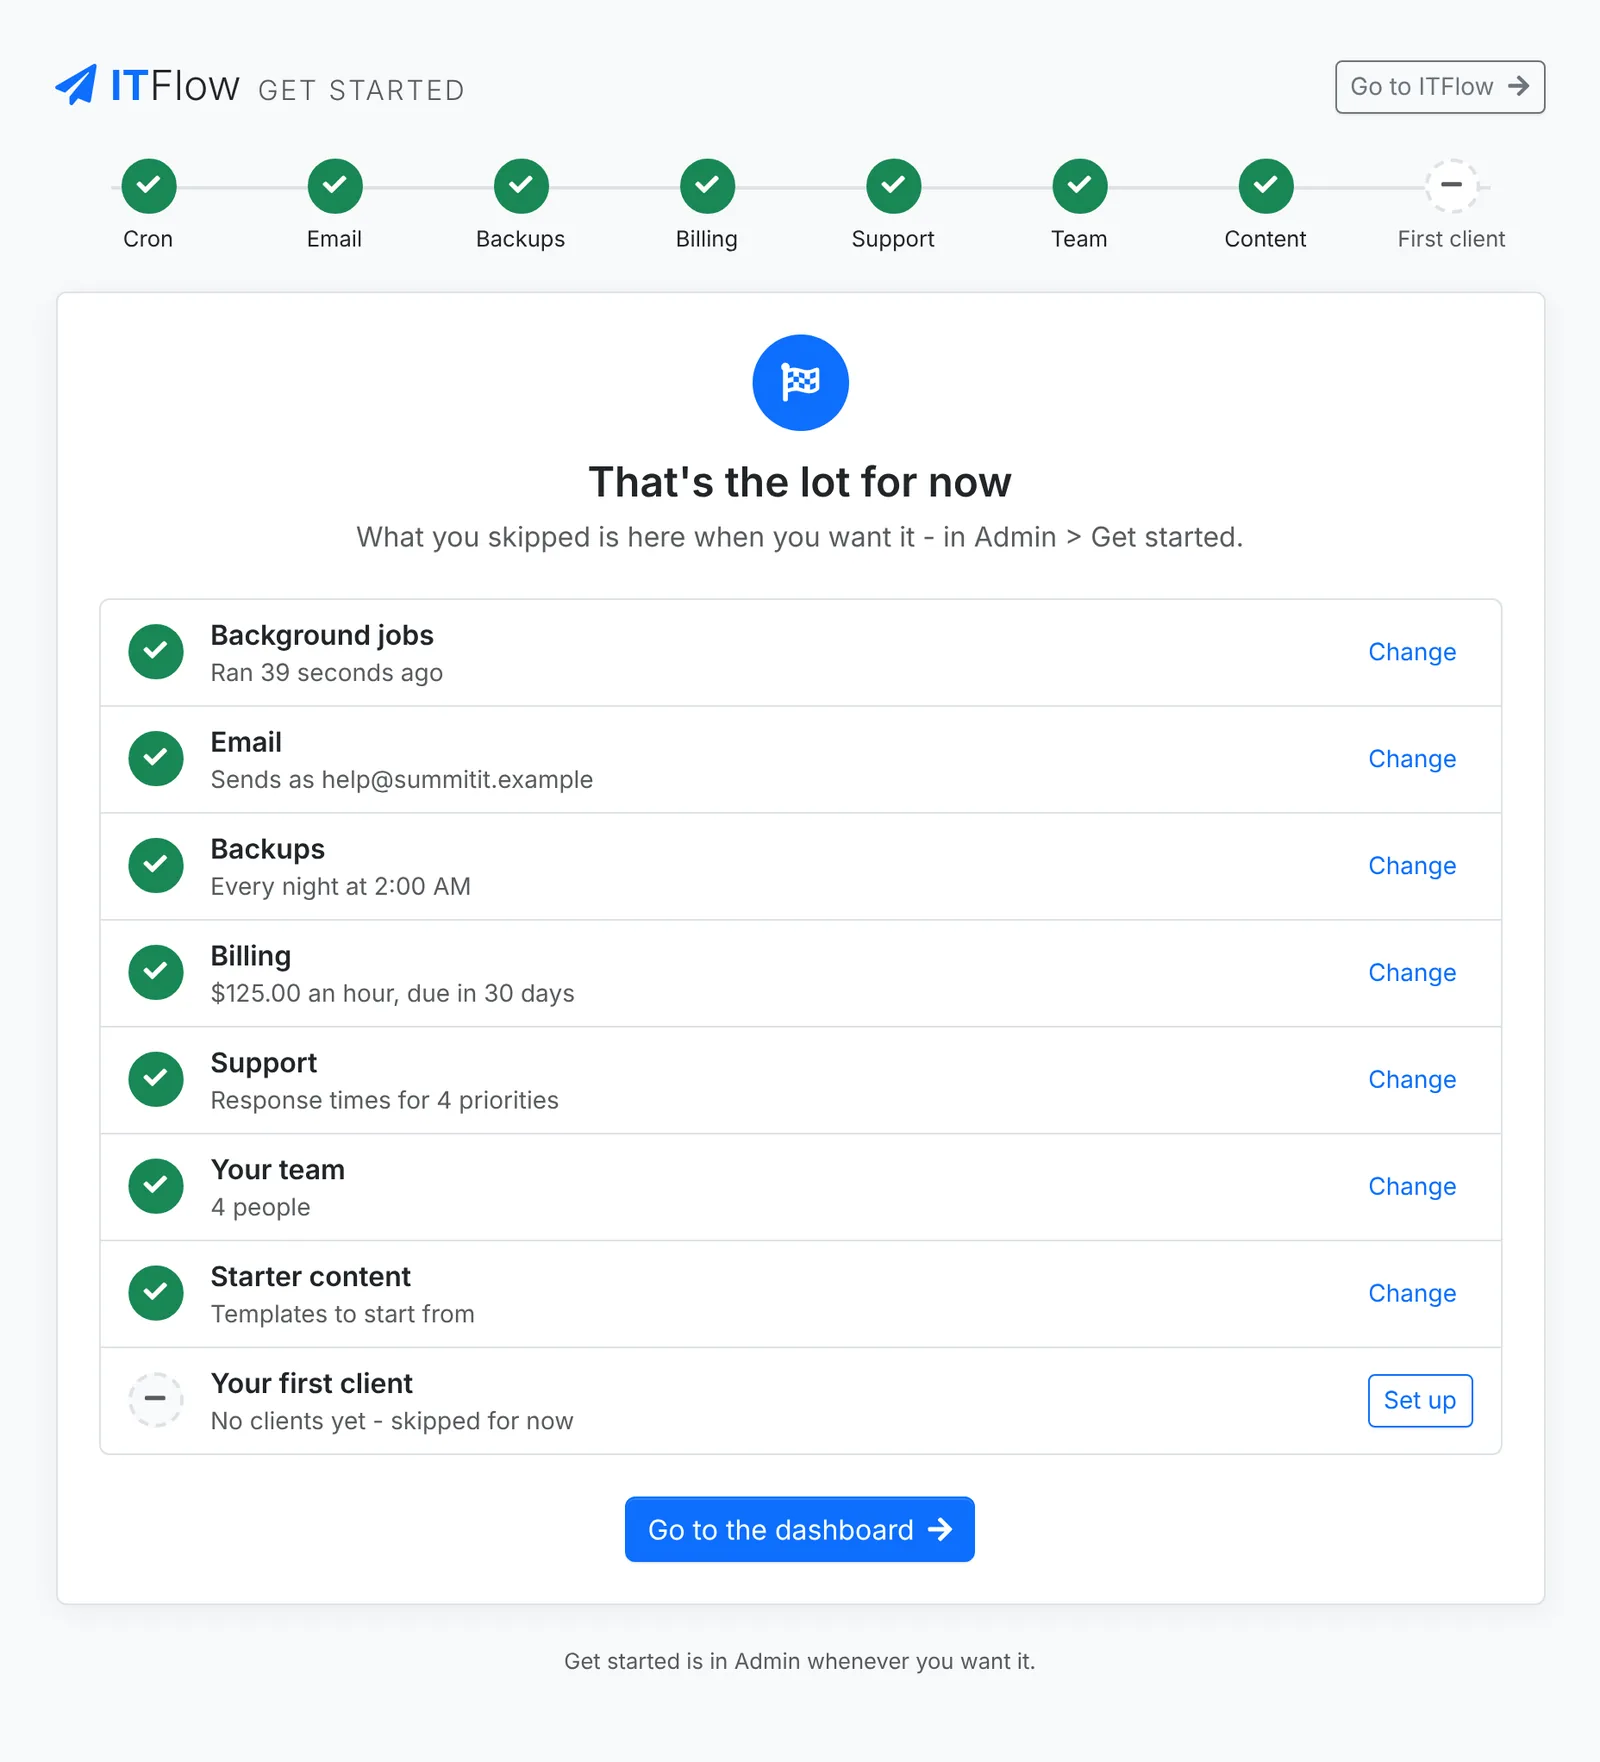
Go to the dashboard takes you into ITFlow.
On the dashboard
Until every step is done or skipped, the dashboard shows admins how far setting up has got and what's next. Carry on opens the next step. Click a step to go straight to it.

The × on the card stops showing it, as Skip all does. Get started stays in Admin > Get started, with how many steps are done or skipped, such as 3/8.
The rest of your settings
Get started covers what ITFlow needs to run. Go through Admin > Settings for the rest: your logo and company details, invoices and billing, taxes and tickets. Check the roles fit how your team works.
When you're ready
- Take card payments: Card payments with Stripe
- Let clients sign in: Client portal settings and Giving contacts access
- Connect an AI model: AI providers and models
- Connect your RMM or scripts: API keys
- Send logs to your SIEM: Logs